Running Unikernels from Existing Linux Applications with OPS

Unikernels are an emerging deployment pattern that engineers are choosing over Linux and Docker because of their performance, security and size. Researchers from NEC are reporting boot times in 5ms while other users talk about how small their VMs can get – in the kilobyte range if you’re using c. Still others like OSv have measured up to a 20% performance advantage in popular databases. However they have remained out of a lot of developers reach because of their low level nature.

That is until we decided to open source a tool called ops.city (OPS). OPS is a new free open source tool that allows anyone, including non-developers to instantly build and run unikernels on linux or mac from their existing software. There is no complicated re-compilation. There is no LDFLAG twiddling or random patching of various libraries you’d never patch yourself. OPS goal is to democratize access to unikernels.

Ok – enough of that – let’s build some unikernels.

First thing you’ll want to do is download ops itself:

curl https://ops.city/get.sh -sSfL | sh

Let’s start with a short example:

Let’s create a working directory:

mkdir p

Now put this into test.php:

<?php

echo ‘test\n’;

?>

From a fresh install you’ll see that there are several pre-made packages available:

Running Unikernels from Existing Linux Applications with OPS 1

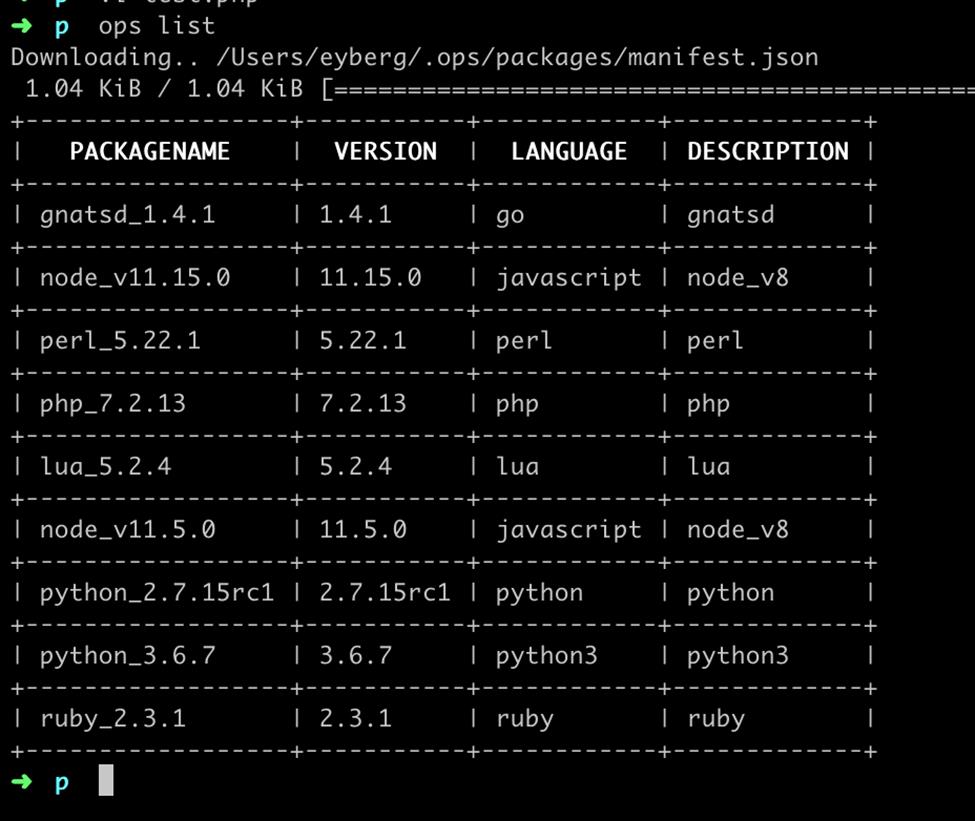
Let’s go ahead and download the php package. The package contains everything that you’ll need to build and run php unikernels but absolutely nothing more. The idea is not to strip things out that aren’t necessary – it’s more of only putting things in to make it work. You’ll notice if you get into the tarball you’ll find an ELF file along with some libraries. This was built for linux but your application won’t actually run on linux. Linux is now 28 years old and predates both commercialized virtualization and what has become known as “the cloud” – namely Amazon Web Services and Google Cloud – both of which heavily use virtualization underneath.

Running Unikernels from Existing Linux Applications with OPS 2

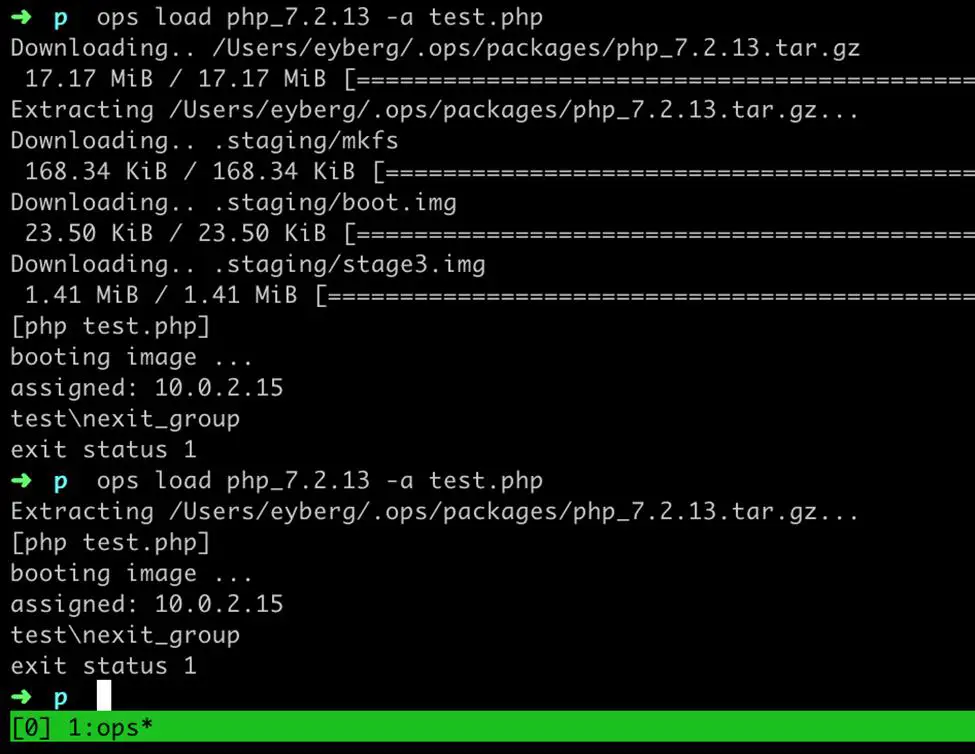
Now if you run the example you’ll see that we boot up our php application and run the code but if you are paying attention you’ll see that this not like Linux where it starts hundreds of programs before it runs yours. Again this is more than just replacing the init manager and applying seccomp. We’ve tailored your application to become it’s own little operating system – how cool is that?

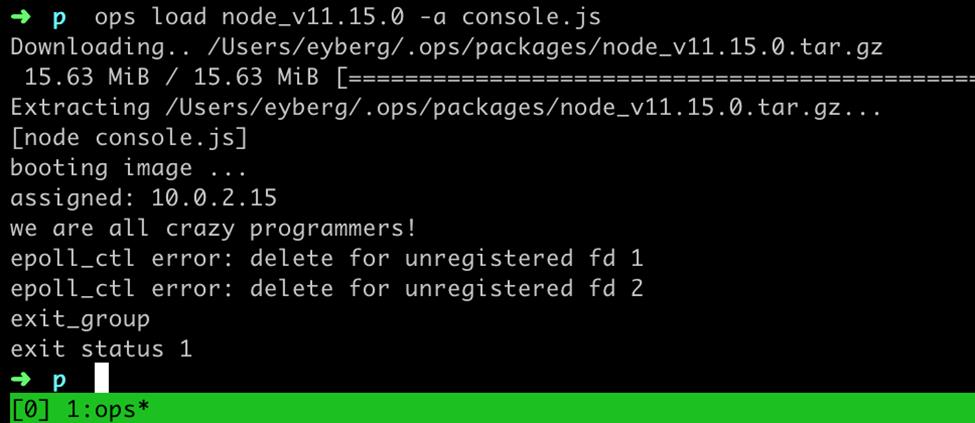
Let’s try another one – put this into test.js :

console.log(“we are all crazy programmers!”);

This time we’ll try out node.js:

Running Unikernels from Existing Linux Applications with OPS 3

It’s important to note that we’ve only showed some basic examples here. OPS is actually capable of loading and running arbitrary ELF binaries.

If you are using docker or kubernetes now you’ll definitely want to pay attention and get involved early in the unikernel ecosystem. If you are a microservices aficionado or serverless fan you should also be paying attention as a lot of people are predicting this to be the underlying infrastructure for these paradigm changing technology growths.

So what are you going to build? Go check out https://github.com/nanovms/ops – fork/star the repo and let us know!

The post Running Unikernels from Existing Linux Applications with OPS appeared first on The Crazy Programmer.

from The Crazy Programmer https://www.thecrazyprogrammer.com/2019/02/running-unikernels-from-existing-linux-applications-with-ops.html

Android Deep Linking Example

In this tutorial you will learn about android deep linking with an example.

In deep linking first we have to understand what does an URI means. Let us consider an example of URI,

https://www.example.com/demo?userid=100&client=android

Here,

  • https is a scheme
  • http://www.example.com is a host
  • /demo is a path, directing the specific resource
  • ?userid=100&client=android is a query string with key-value pairs like the hashmap in java.

Deeplink is defined as a source of content to content web to your android application and in deeplink whenever user opens an URI and if that URI is deep link with any application then it opens a dialog prompt that open with that app or open with browser only.

We can create deeplink over network that is connecting website directly to the application or we can create custom deplink also like myApplication://….

Android Deep Linking Example

First of all create a new android project to understand deeplink in android app.

Now make intent filter in the activity that you want to open when user click on weblink.

<intent-filter android:label="@string/app_name">
<action android:name="android.intent.action.VIEW" />
<category android:name="android.intent.category.DEFAULT" />
<category android:name="android.intent.category.BROWSABLE" />
<data android:scheme="myapp"
android:host="myhost"
android:pathPrefix="/help"/>
</intent-filter>

What we are doing in this project is when we are clicking on weblink then we are opening the app and showing the weblink in the text view.

activity_main.xml

<?xml version="1.0" encoding="utf-8"?>
<RelativeLayout xmlns:android="http://schemas.android.com/apk/res/android"
    xmlns:app="http://schemas.android.com/apk/res-auto"
    xmlns:tools="http://schemas.android.com/tools"
    android:layout_width="match_parent"
    android:layout_height="match_parent"
    tools:context=".MainActivity">

    <TextView
        android:layout_width="wrap_content"
        android:layout_height="wrap_content"
        android:layout_centerHorizontal="true"
        android:layout_centerVertical="true"
        android:textSize="20sp"
        android:id="@+id/deepLinkText"
        android:textColor="#000000"/>

</RelativeLayout>

Now we are designing its java class to represent weblink when user click on it on textview.

MainActivity.java

package com.example.deeplinkdemo;

import android.content.Intent;
import android.support.v7.app.AppCompatActivity;
import android.os.Bundle;
import android.widget.TextView;

public class MainActivity extends AppCompatActivity {

    @Override
    protected void onCreate(Bundle savedInstanceState) {
        super.onCreate(savedInstanceState);
        setContentView(R.layout.activity_main);

        Intent intent=getIntent();

        if(intent!=null&&intent.getData()!=null){
            ((TextView)findViewById(R.id.deepLinkText)).setText(intent.getData().toString());
        }
    }
}

Build app for about project and install it in your mobile device.

Below we are designing a custom html file when user open that html file and click on the link on that html file then our app will open.

<!DOCTYPE html>
<html>
<head>

<body>

	<a href="myapp://myhost/help">myapp://myhost/help</a>

</body>

</head>

</html>

Now you can run and test your application.

Android Deep Linking ExampleAndroid Deep Linking Example

The post Android Deep Linking Example appeared first on The Crazy Programmer.

from The Crazy Programmer https://www.thecrazyprogrammer.com/2019/02/android-deep-linking-example.html

Exploring nopCommerce – open source e-commerce shopping cart platform in .NET Core

nopCommerce demo siteI’ve been exploring nopCommerce. It’s an open source e-commerce shopping cart. I spoke at their conference in New York a few years ago and they were considering moving to open source and cross-platform .NET Core from the Windows-only .NET Framework, so I figured it was time for me to check in on their progress.

I headed over to https://github.com/nopSolutions/nopCommerce and cloned the repo. I have .NET Core 2.2 installed that I grabbed here. You can check out their official site and their live demo store.

It was a simple git clone and a “dotnet build” and it build and ran quite immediately. It’s always nice to have a site “just work” after a clone (it’s kind of a low bar, but no matter what the language it’s always a joy when it works.)

I have SQL Express installed but I could just as easily use SQL Server for Linux running under Docker. I used the standard SQL Server Express connection string: “Server=localhost\SQLEXPRESS;Database=master;Trusted_Connection=True;” and was off and running.

nopCommerce is easy to setup

It’s got a very complete /admin page with lots of Commerce-specific reports, the ability to edit the catalog, have sales, manage customers, deal with product reviews, set promotions, and more. It’s like WordPress for Stores. Everything you’d need to put up a store in a few hours.

Very nice admin site in nopCommerce

nopCommerce has a very rich plugin marketplace. Basically anything you’d need is there but you could always write your own in .NET Core. For example, if I want to add Paypal as a payment option, there’s 30 plugins to choose from!

NOTE: If you have any theming issues (css not showing up) with just using “dotnet build,” you can try “msbuild” or opening the SLN in Visual Studio Community 2017 or newer. You may be seeing folders for plugins and themes not being copied over with dotnet build. Or you can “dotnet publish” and run from the publish folder.

Now, to be clear, I just literally cloned the HEAD of the actively developed version and had no problems, but you might want to use the most stable version from 2018 depending on your needs. Either way, nopCommerce is a clean code base that’s working great on .NET Core. The community is VERY active, and there’s a company behind the open source version that can do the work for you, customize, service, and support.


Sponsor: The next generation of Jira has arrived, with new roadmaps, more flexible boards, overhauled configuration, and dozens of new integrations. Whatever new awaits you, begin it here. In a new Jira.


© 2018 Scott Hanselman. All rights reserved.


from Scott Hanselman’s Blog http://feeds.hanselman.com/~/597843076/0/scotthanselman~Exploring-nopCommerce-open-source-ecommerce-shopping-cart-platform-in-NET-Core.aspx

Django – Getting Data from PostgreSQL and Showing it to Template

In this Django tutorial, we’ll see how we can get the data stored in the database and display it to the template.

Prerequisites

Have a look on the previous article, in which we’ve seen how to create an app, model and create a super user to work with admin interface.

https://www.thecrazyprogrammer.com/2019/01/django-models.html

So let’s start.

Getting Data from PostgreSQL and Showing it to Template

1. Upload Data First

We’ve already created a model Job inside jobs app, which is having two fields ImageField and CharField, ImageField for storing a picture for a particular job and TextField to store the summary about that job.

Screenshot of Model Job:

Getting Data from PostgreSQL and Showing it to Template 1

Screenshot of Admin Panel:

Getting Data from PostgreSQL and Showing it to Template 1

Getting Data from PostgreSQL and Showing it to Template 3

Currently we have no data inside our database. So let’s upload some data using the admin panel. (we’ll also see how to upload data using templates in later articles). So click on ADD JOB button and upload some pics and text.

Getting Data from PostgreSQL and Showing it to Template 4

So I’ve added two Job objects. Now let’s see how to get them and print them on the template.

Getting Data from PostgreSQL and Showing it to Template 52. Create a Template

Now I am going to create a template inside the jobs App. You can also create outside the App as we have created in the previous article. But as we’re going to show jobs on that template so its a good idea to create the templates related to the jobs App inside the App.

So to create a template inside app, first create a directory named as templates inside the jobs app, then create a directory with the same name as app inside templates. So our directory structure will look like this:

Getting Data from PostgreSQL and Showing it to Template 6

Inside this jobs folder we’ll create a HTML file named as myjobs.html.

Getting Data from PostgreSQL and Showing it to Template 7

3. Create a URL Path for Template

To create a url path, open your urls.py file and add a path for our newly created template myjobs.html.

Currently we’ve only one path in our urls.py, which we have also used to open admin panel.

Getting Data from PostgreSQL and Showing it to Template 8

And now add this line to load images from MEDIA_ROOT:

+ static(settings.MEDIA_URL, document_root = settings.MEDIA_ROOT)

To use static and settings in above line we’ve to import:

from django.conf.urls.static import static

from django.conf import settings

So finally our urls.py will look like:

from django.contrib import admin
from django.urls import path
from jobs import views
from django.conf.urls.static import static
from django.conf import settings
urlpatterns = [
    path('admin/', admin.site.urls),
    path('myjobs/', views.showjobs),
 ] + static(settings.MEDIA_URL, document_root = settings.MEDIA_ROOT)

Now we’ll add one more path to navigate to myjobs template.

urls.py:

from django.contrib import admin
from django.urls import path
from jobs import views

urlpatterns = [
    path('admin/', admin.site.urls),
    path('myjobs/', views.showjobs),
]

So I’ve added a new path for my jobs have two parameters, first is the URL to navigate to myjobs.html and second one is a functions name which will describe what to do when someone open the URL ‘domain-name.com/myjobs’, in our case it is https://localhost:8000/myjobs.

So now we’ve to create a function named as showjobs inside the views.py of jobs app. If you’re wondering that how we can access views.py file of jobs app in urls.py, then take a look on the third line in above code where I had imported views of jobs app.

4. Create a Function to Return the Template

Open views.py file and add a function named as showjobs.

views.py:

from django.shortcuts import render
from .models import Job

def showjobs(request):
    jobs = Job.objects
    return render(request, 'jobs/myjobs.html', { 'jobs':jobs } )

Getting Data from PostgreSQL and Showing it to Template 9

In the second line we’ve imported our model Job to get access to all the Job objects stored in our database. In Line 5, we’re getting all the objects from database and store it into the new variable called jobs. At last we’re passing that jobs variable with the same key name to the template.

5. Edit Template File to Show Jobs

myjobs.html:


Now run the server and open the link below:

 http://localhost:8000/myjobs/

Getting Data from PostgreSQL and Showing it to Template 10

So that’s all. Finally we got our data from database and displayed it on the template.

How it is Working

Let’s say, a user want to access a web-page on our website, his/her request will be redirected to the urls.py. For example – user tries to access domain-name.com/myjobs/ (https://localhost:8000/myjobs) so his request will be redirected to urls.py looking for a path having ‘myjobs/’ after domain name.

  • In urls.py, we have a path for myjobs (line 10)

  path(‘myjobs/’, views.showjobs),

After requested URL found, the request will be redirected to the function written along with the path. In our case it is views.showjobs.

  • In views, we have a functions called showjobs

Getting Data from PostgreSQL and Showing it to Template 11

which is receiving the request and return a HTML template myjobs.html to the user along with the all the objects stored in the database.

So now myjobs.html will be displayed to the user.

  • On myjobs.html page:

on template we’ve all the objects of model Job sent from the showjobs function. So we’ll loop through all the objects using for loop and display it.

Getting Data from PostgreSQL and Showing it to Template 12

To display the image we’ve used <img> tag and to print the summary, the <p> is used.

So that’s all for this tutorial.

If you’ve any confusion related with this topic, let us know in the comment box.

The post Django – Getting Data from PostgreSQL and Showing it to Template appeared first on The Crazy Programmer.

from The Crazy Programmer https://www.thecrazyprogrammer.com/2019/02/django-getting-data-from-postgresql-and-showing-it-to-template.html

How to convert an IMG file to an standard ISO easily with Linux on Windows 10

Modded Goldstar 3DO for USBThe optical disc drive is giving out on my GoldStar 3DO machine. It’s nearly 30 years old. I want to make sure that the kids and I can still play our 3DO discs. I ordered this fantastic USB mod for the 3DO from a fellow out of Belarus. It came and it’s great. It includes a game/file selector app that you boot off of if you put it in the root of a FAT32 formatted USB drive.

However, when I cloned my collection of CD-ROMS I ended up with a bunch of IMG files, and this mod wants ISO files. I thought my cloner was going to give me ISOs. I did the obvious thing and googled for “how to convert an img file to an iso.”

This plunged me into the hellscape that is CNET and Major Geeks download wrappers. Every useful application or utility out there is hidden on a page filled with Download Now buttons that aren’t the button you want OR if you get the app you want, it’s actually a Chrome Search hijacker. I just want to convert a damn IMG to an ISO. If you want to do this on Windows you’re going to be installing a bunch of virus-laden trial ISO cracking crap.

Fortunately, Windows 10 can run Linux very nicely, thank you very much. Go install Ubuntu from the Windows Store and get set up ASAP.

I just installed ccd2iso inside Ubuntu on my Windows 10 machine.

scott@IRONHEART:~$ sudo apt install ccd2iso

Reading package lists... Done
Building dependency tree
Reading state information... Done
The following NEW packages will be installed:
ccd2iso
0 upgraded, 1 newly installed, 0 to remove and 27 not upgraded.
Need to get 7406 B of archives.
After this operation, 26.6 kB of additional disk space will be used.
Get:1 http://archive.ubuntu.com/ubuntu bionic/universe amd64 ccd2iso amd64 0.3-7 [7406 B]
Fetched 7406 B in 0s (21.0 kB/s)
Selecting previously unselected package ccd2iso.
(Reading database ... 61432 files and directories currently installed.)
Preparing to unpack .../ccd2iso_0.3-7_amd64.deb ...
Unpacking ccd2iso (0.3-7) ...
Processing triggers for man-db (2.8.3-2ubuntu0.1) ...
Setting up ccd2iso (0.3-7) ...
scott@IRONHEART:~$ cd /mnt/c/Users/scott/Desktop/3do/

Then I cd (change directory) into my file system where my IMG backups are. Note that my C:\ drive on Windows is at /mnt/c so you can see me in a folder on my Desktop here. Then just run ccd2iso.

scott@IRONHEART:/mnt/c/Users/scott/Desktop/3do$ ccd2iso AloneInTheDark.img AloneInTheDark.iso

179500 sector written
Done.

Boom. Super fast and does the job and now I’m up and running! Regardless of why you got to this blog post and needed to convert an IMG to an ISO, I hope this helps and saves you some time!


Sponsor: The next generation of Jira has arrived, with new roadmaps, more flexible boards, overhauled configuration, and dozens of new integrations. Whatever new awaits you, begin it here. In a new Jira. 


© 2018 Scott Hanselman. All rights reserved.


from Scott Hanselman’s Blog http://feeds.hanselman.com/~/597312684/0/scotthanselman~How-to-convert-an-IMG-file-to-an-standard-ISO-easily-with-Linux-on-Windows.aspx

Lighting up my DasKeyboard with Blood Sugar changes using my body’s REST API

imageI’ve long blogged about the intersection of diabetes and technology. From the sad state of diabetes tech in 2012 to its recent promising resurgence, it’s clear that we are not waiting.

If you’re a Type 1 Diabetic using a CGM – a continuous glucose meter – you’ll want to set up Nightscout so you can have a REST API for your sugar. The CGM checks my blood sugar every 5 minutes, it hops via BLE over to my phone and then to the cloud. You’ll want your sugars stored in cloud storage that YOU control. CGM vendors have their own cloud, but we can easily bridge over to a MongoDB database.

I run Nightscout in Azure and my body has a REST API. I can do an HTTP GET like this:

/api/v1/entries.json?count=3

and get this

[

{
_id: "5c6066d477b2a69a0a7810e5",
sgv: 143,
date: 1549821626000,
dateString: "2019-02-10T18:00:26.000Z",
trend: 4,
direction: "Flat",
device: "share2",
type: "sgv"
},
{
_id: "5c6065a877b2a69a0a7801ce",
sgv: 134,
date: 1549821326000,
dateString: "2019-02-10T17:55:26.000Z",
trend: 4,
direction: "Flat",
device: "share2",
type: "sgv"
},
{
_id: "5c60647b77b2a69a0a77f381",
sgv: 130,
date: 1549821026000,
dateString: "2019-02-10T17:50:26.000Z",
trend: 4,
direction: "Flat",
device: "share2",
type: "sgv"
}
]

I can change the URL from a .json to a .txt and get this

2019-02-10T18:00:26.000Z    1549821626000    143    Flat    

2019-02-10T17:55:26.000Z 1549821326000 134 Flat
2019-02-10T17:50:26.000Z 1549821026000 130 Flat

The “flat” value at the end is part of an enum that can give me a generalized trend value. Diabetics need to manage our sugars at the least hour by house and sometimes minute by minute. As such it’s super important that we have “glanceable displays.” That means anything at all that gives me a sense (a sixth sense, if you will) of how I’m doing.

That might be:

I got a Das Keyboard 5Q recently – I first blogged about Das Keyboard in 2006! and noted that it’s got it’s own local REST API. I’m working on using their Das Keyboard Q software’s Applet API to light up just the top row of keys in response to my blood sugar changing. It’ll use their Node packages and JavaScript and run in the context of their software.

However, since the keyboard has a localhost REST API and so does my blood sugar, I busted out this silly little shell script. Add a cron job and my keyboard can turn from orange (low), to green, yellow, red (high) as my sugar changes. That provides a nice ambient notifier of how my sugars are doing. Someone on Twitter said “who looks at their keyboard?” I mean, OK, that’s just silly. If my entire keyboard turns run I will notice it. Again, ambient. I could certainly add an alert and make a klaxon go off if you’d like.

This local keyboard API is meant to send a signal to a single zone or key, so it’s hacky of me (and them, really) to make 100+ REST calls to color the whole keyboard. But, it’s a localhost call and it’s not that spendy. This will go away when I move to their new API. Here’s a video of it working.

What are some other good ideas for ambient sugar alerts? An LCD strip around the monitor (bias lighting)? A Phillips Hue smart light?

Consider also that you could use the glanceable display idea for pulse, anxiety, blood pressure – anything in your body you could hook up to in real- or near-realtime.


Sponsor: Get the latest JetBrains Rider with Code Vision, Rename Project refactoring, and the Assembly Explorer. Improved support for C#, VB.NET, F#, TypeScript, and Angular is all included.


© 2018 Scott Hanselman. All rights reserved.


from Scott Hanselman’s Blog http://feeds.hanselman.com/~/596462438/0/scotthanselman~Lighting-up-my-DasKeyboard-with-Blood-Sugar-changes-using-my-bodys-REST-API.aspx

How to Install Joomla 3 on Web Hosting – A Complete Guide

Joomla is among the most popular free Content Management Systems (CMS) in the world. It helps in creating and managing dynamic websites with its intuitive management interface. In short, it is a collection of PHP (Hypertext Preprocessor) scripts.

Installing Joomla is not a rocket science if you know how to move ahead step-by-step. However, before you start installing, it is wise to choose web hosting provider carefully. Once you choose the hosting for Joomla, it’s high time to go with installing it on your web hosting account.

So, without further delay, let’s talk about the steps to install Joomla on a web hosting account.

Let’s get started…

How to Install Joomla 3 on Web Hosting

Step 1 – Download the Joomla Installation Pack

How to Install Joomla 3 on Web Hosting 1

This is the first step to start with the installation process. Make sure to download it from the official site of Joomla because if you download it from other sites, chances are your setup files will be at the risk of malicious code. After clicking on the “Download” icon, the installation package will be moved and saved directly to your hard disk. Save the installation with the name Joomla_xxx package or same like this and save to the new folder so that you will locate it easily when needed.

Step 2 – Upload the Files of Joomla to Your Server

The next step to install Joomla is to upload the withdrawal files and folders to the server. To make it easier, upload the Joomla installation files through FTP. File Transfer Protocol is the convenient yet fast way to transfer files online. Many webmasters use FTP to upload their websites files on their hosting account. To know more about how to upload Joomla files through FTP, checkout the link.

Step 3 – Create a MySQL Database

Moving to the third step to install Joomla, you need to create a MySQL database and assign it to the user with full permissions. You can choose the MySQL database wizard in order to create a user account. To access this tool, access your cPanel and click on the icon of the tool. Create an account by following the steps and you will get a message on successful user account creation.

How to Install Joomla 3 on Web Hosting 2

After creating the MySQL Database and user account, write down the name of the database, username and password. For installation process, you need these details.

Step 4 – Proceed with the Installation Process

Here comes the final step- The Installation Process. To install Joomla 3 on the web hosting account, you need to open your browser and navigate it to the main domain, depending on where you have installed the package. After this, you will be directed to the first screen of the Joomla web installer. Now add your important information like your site name and username and get set go. Have a look at the image below

How to Install Joomla 3 on Web Hosting 3

What to Fill in the boxes above?

  • Select your language you are comfortable in.
  • Enter the site name
  • In the description box, write a brief description.
  • In the admin email section, enter a valid email address that will be used for system messages and for password recovery.
  • In the Admin username box, add your administrative username
  • Admin Password – Make sure the password is strong
  • In the site offline box choose if you want your site to be offline after installation.
  • After filling the required details, click on the Next button and go ahead with the installation.

Step 5:

How to Install Joomla 3 on Web Hosting 4

You will be directed to this screen when you click on the next!

What to fill in the boxes above?

  • In the Database Type, set it to MySQL which is by default
  • In the next box, Host name, leave it default.
  • Then in the Username box, enter your username for MySQL database
  • In the Password box, fill the strong password
  • In the Database box, enter the MySQL database name you want to use
  • In the Table Prefix, Joomla will adds to its database tables. This is helpful for those who want to host different Joomla sites on a sole database.

Click on the Next button to move forward and you will be directed to the last page of the final installation process.

How to Install Joomla 3 on Web Hosting 5

When you move to the second part of the page, you will see pre-installation checks. You will see a green check after each line and moreover, SiteGround servers meet all the requirements of the Joomla.

Lastly, click on the Install button and in a few minutes, you will be directed to the Joomla Web Installer, which is the last screen. Press Remove Installation folder button which is essential for security sake. Remember, you won’t be able to use the site unless you remove this folder. So do it as soon as possible.

How to Install Joomla 3 on Web Hosting 6

Now after removing the installation folder, you are done with Joomla installation process! Congratulations as now you have a fully access to your Joomla website!

The post How to Install Joomla 3 on Web Hosting – A Complete Guide appeared first on The Crazy Programmer.

from The Crazy Programmer https://www.thecrazyprogrammer.com/2019/02/how-to-install-joomla-3-on-web-hosting.html

Difference between Von Neumann and Harvard Architecture

Architecture of a micro computer or a micro controller refers to the arrangement of the CPU with respect of the RAM and ROM. Hence, the Von-Neuman and Harvard architecture are the two ways through which the micro controller can have its arrangement of the CPU with RAM and ROM.

Difference between Von Neumann and Harvard Architecture

Point of Comparison Harvard Architecture Von Neumann Architecture
Arrangement In Harvard architecture, the CPU is connected with both the data memory (RAM) and program memory (ROM), separately.

Harvard Architecture

In Von-Neumann architecture, there is no separate data and program memory. Instead, a single memory connection is given to the CPU.

Von Neumann Architecture

Hardware requirements It requires more hardware since it will be requiring separate data and address bus for each memory. In contrast to the Harvard architecture, this requires less hardware since only a common memory needs to be reached.
Space requirements This requires more space. Von-Neumann Architecture requires less space.
Speed of execution Speed of execution is faster because  the processor fetches data and instructions simultaneously . Speed of execution is slower since it cannot fetch the data and instructions at the same time.
Space usage It results in wastage of space since if the space is left in the data memory then the instructions memory cannot use the space of the data memory and vice-versa. Space is not wasted because the space of the data memory can be utilized by the instructions memory and vice-versa.
Controlling Controlling becomes complex since data and instructions are to be fetched simultaneously. Controlling becomes simpler since either data or instructions are to be fetched at a time.

Image Source: https://www.polytechnichub.com/difference-harvard-architecture-von-neumann-architecture/

The above given difference between the Harvard and Von Neumann architecture is very helpful in getting a clear understanding of the difference between the two types of architecture.

The post Difference between Von Neumann and Harvard Architecture appeared first on The Crazy Programmer.

from The Crazy Programmer https://www.thecrazyprogrammer.com/2019/02/difference-between-von-neumann-and-harvard-architecture.html

Teaching Kids to Code with Minecraft Mods made easy using MakeCode and Code Connection

Back in the day, making a Minecraft mod was…challenging. It was a series of JAR files and Java hacks and deep folder structures. It was possible, but it wasn’t fun and it surely wasn’t easy. I wanted to revisit things now that Minecraft is easily installed from the Windows Store.

Today, it couldn’t be easier to make a Minecraft Mod, so I know what my kids and I are doing tonight!

I headed over to https://minecraft.makecode.com/setup/minecraft-windows10 and followed the instructions. I already have Minecraft installed, so I just had to install the Minecraft Code Connection app. The architecture here is very clean and clever. Basically you turn on cheats in Minecraft and use a local websockets connection between the Code Connection app and Minecraft – you’re automating Minecraft from an external application!

Here I’m turning on cheats in a new Miencraft world:

Minecraft Allow Cheats

Then from the Code Connection app, I get a URL for the automation server, then go back to Minecraft, hit “t” and paste it in the URL. Now the two apps are talking to each other.

Connecting Minecraft to MakeCode

I can automate with MakeCode, Scratch, or other editors. I’ll do MakeCode.

Make Code is amazing

Then an editor opens. This is the same base open source Make Code editor I used when I was coding for an Adafruit Circuit Playground Express earlier this year.

Now, I’ll setup a chat command in Make Code that makes it rain chickens when I type the chat command “chicken.” It runs a loop and spawns 100 chickens 10 blocks above my character’s head.

Chicken rain

I was really surprised how easy this was. It was maybe 10 mins end to end, which is WAY easier than the Java add-ins I learned about just a few years ago.

Minecraft Chicken Rain

There are a ton of tutorials here, including Chicken Rain. https://minecraft.makecode.com/tutorials

The one I’m most excited to show my kids is the Agent. Your connection to the remote Code Connection app includes an avatar or “agent.” Just like Logo (remember that, robot turtles?) you can control your agent and make him build stuff. No more tedious house building for us! Let’s for-loop our way to glory and teach dude how to make us a castle!


Sponsor: Get the latest JetBrains Rider with Code Vision, Rename Project refactoring, and the Assembly Explorer. Improved support for C#, VB.NET, F#, TypeScript, and Angular is all included.


© 2018 Scott Hanselman. All rights reserved.


from Scott Hanselman’s Blog http://feeds.hanselman.com/~/596233468/0/scotthanselman~Teaching-Kids-to-Code-with-Minecraft-Mods-made-easy-using-MakeCode-and-Code-Connection.aspx

Brainstorming – Creating a small single self-contained executable out of a .NET Core application

I’ve been using ILMerge and various hacks to merge/squish executables together for well over 12 years. The .NET community has long toyed with the idea of a single self-contained EXE that would “just work.” No need to copy a folder, no need to install anything. Just a single EXE.

While work and thought continues on a CoreCLR Single File EXE solution, there’s a nice Rust tool called Warp that creates self-contained single executables. Warp is cross-platform, works on any tech, and is very clever

The Warp Packer app has a slightly complex command line, like this:

.\warp-packer --arch windows-x64 --input_dir bin/Release/netcoreapp2.1/win10-x64/publish --exec myapp.exe --output myapp.exe

Fortunately Hubert Rybak has created a very nice “dotnet-pack” global tool that wraps this all up into a single command, dotnet-pack.

NOTE: There is already a “dotnet pack” command so this dotnet-pack global tool is unfortunately named. Just be aware they are NOT the same thing.

All you have to do is this:

C:\supertestweb> dotnet tool install -g dotnet-pack

C:\supertestweb> dotnet-pack
O Running Publish...
O Running Pack...

In this example, I just took a Razor web app with “dotnet new razor” and then packed it up with this tool using Warp packer. Now I’ve got a 40 meg self-contained app. I don’t need to install anything, it just works.

C:\supertestweb> dir

Directory: C:\supertestweb

Mode LastWriteTime Length Name
---- ------------- ------ ----
d----- 2/6/2019 9:14 AM bin
d----- 2/6/2019 9:14 AM obj
d----- 2/6/2019 9:13 AM Pages
d----- 2/6/2019 9:13 AM Properties
d----- 2/6/2019 9:13 AM wwwroot
-a---- 2/6/2019 9:13 AM 146 appsettings.Development.json
-a---- 2/6/2019 9:13 AM 157 appsettings.json
-a---- 2/6/2019 9:13 AM 767 Program.cs
-a---- 2/6/2019 9:13 AM 2115 Startup.cs
-a---- 2/6/2019 9:13 AM 294 supertestweb.csproj
-a---- 2/6/2019 9:15 AM 40982879 supertestweb.exe

Now here’s what it gets interesting. Let’s say I have a console app. Hello World, packed with Warp, ends up being about 35 megs. But if I use the “dotnet-pack -l aggressive” the tool will add the Mono ILLinker (tree shaker/trimmer) and shake off all the methods that aren’t needed. The resulting single executable? Just 9 megs compressed (20 uncompressed).

C:\squishedapp> dotnet-pack -l aggressive

O Running AddLinkerPackage...
O Running Publish...
O Running Pack...
O Running RemoveLinkerPackage...
C:\squishedapp> dir
Mode LastWriteTime Length Name
---- ------------- ------ ----
d----- 2/6/2019 9:32 AM bin
d----- 2/6/2019 9:32 AM obj
-a---- 2/6/2019 9:31 AM 47 global.json
-a---- 2/6/2019 9:31 AM 193 Program.cs
-a---- 2/6/2019 9:32 AM 178 squishedapp.csproj
-a---- 2/6/2019 9:32 AM 9116643 squishedapp.exe

Here is where you come in!

NOTE: The .NET team has planned to have a “single EXE” supported packing solution built into .NET 3.0. There’s a lot of ways to do this. Do you zip it all up with a header/unzipper? Well, that would hit the disk a lot and be messy. Do you “unzip” into memory? Do you merge into a single assembly? Or do you try to AoT (Ahead of Time) compile and do as much work as possible before you merge things? Is a small size more important than speed?

What do you think? How should a built-in feature like this work and what would YOU focus on?


Sponsor: Check out Seq 5 for real-time diagnostics from ASP.NET Core and Serilog, now with faster queries, support for Docker on Linux, and beautiful new dark and light themes.


© 2018 Scott Hanselman. All rights reserved.


from Scott Hanselman’s Blog http://feeds.hanselman.com/~/595887896/0/scotthanselman~Brainstorming-Creating-a-small-single-selfcontained-executable-out-of-a-NET-Core-application.aspx

Design a site like this with WordPress.com
Get started