The Transitive Property of Friendship – and the importance of the Warm Intro

Too many LinkedIn invitationsPer Wikipedia, “In mathematics, a binary relation … is transitive if … element a is related to an element b and b is related to an element c then a is also related to c.

Per Me, if I am cool with you, and you are cool with your friend, then I’m cool with your friend. I’ve decided this is The Transitive Property of Friendship.

As I try to mentor more and more people and help folks Level Up in tech, I’m realizing how important it is to #BeTheLuck for someone else. This is something that YOU can do – volunteer at local schools, forward that resume for your neighbor, give a Warm Intro to a friend of a friend.

A lot of one’s success can be traced back to hard work and being prepared for opportunities to present themselves, but also to Warm Intros. Often you’ll hear about someone who worked hard in school, studied, did well, but then got a job because “their parent knew a person who worked at x.” That’s something that is hard to replicate. For under-represented folks trying to break into tech, for example, it’s the difference between your resume sitting in a giant queue somewhere vs. sitting on the desk of the hiring manager. Some people inherit a personal network and a resume can jump to the top of a stack with a single phone call, while others send CV after CV with nary a callback.

This is why The Warm Intro is so important. LinkedIn has tried to replicate this by allowing you to “build your professional network” but honestly, you can’t tell if I’m cool with someone on LinkedIn just because they’re connected to me. Even Facebook “friends” have changed the definition of friend. It certainly has for me. Now I’m mentally creating friend categories like work colleague, lowercase f friend, Uppercase F Friend, etc.

Here’s where it gets hard. You can’t help everyone. You also have to protect yourself and your own emotional well-being. This is where cultivating a true network of genuine friends and work colleagues comes in. If your First Ring of Friends are reliable, kind, and professional, then it’s safer to assume that anyone they bring into your world has a similar mindset. Thus, The Transitive Property of Friendship – also know as “Any friend of Scott’s is a friend of mine.” The real personal network isn’t determined by Facebook or LinkedIn, it’s determined by your gut, your experiences, and your good judgment. If you get burned, you’ll be less likely to recommend someone in the future.

I’ve been using this general rule to determine where and when to spend my time while still trying to Lend my Privilege to as many people as possible. It’s important also to not be a “transactional networker.” Be thoughtful if you’re emailing someone cold (me or otherwise). Don’t act like an episode of Billions on Showtime. We aren’t keeping score, tracking favors, or asking for kickbacks. This isn’t about Amazon Referral Money or Finder’s Fees. When a new friend comes into your life via another and you feel you can help, give of your network and time freely. Crack the door open for them, and then let them kick it open and hopefully be successful.

All of this starts by you – we – building up warm, genuine professional relationships with a broad group of people. Then using that network not just for yourself, but to lift the voices and careers of those that come after you.

What are YOUR tips and thoughts on building a warm and genuine personal and professional network of folks?


Sponsor: Manage GitHub Pull Requests right from the IDE with the latest JetBrains Rider. An integrated performance profiler on Windows comes to the rescue as well.


© 2018 Scott Hanselman. All rights reserved.


from Scott Hanselman’s Blog http://feeds.hanselman.com/~/600338542/0/scotthanselman~The-Transitive-Property-of-Friendship-and-the-importance-of-the-Warm-Intro.aspx

Displaying your realtime Blood Glucose from NightScout on an AdaFruit PyPortal

file-2AdaFruit makes an adorable tiny little Circuit Python IoT device called the PyPortal that’s just about perfect for the kids – and me. It a little dakBoard, if you will – a tiny totally programmable display with Wi-Fi and  lots of possibilities and sensors. Even better, you can just plug it in over USB and edit the code.py file directly on the drive that will appear. When you save code.py the device soft reboots and runs your code.

I’ve been using Visual Studio Code to program Circuit Python and it’s become my most favorite IoT experience so far because it’s just so easy. The “Developer’s Inner Loop” of code, deploy, debug is so fast.

As you may know, I use a Dexcom CGM (Continuous Glucose Meter) to manage my Type 1 Diabetes. I feed the data every 5 minutes into an instance of the Nightscout Open Source software hosted in Azure. That gives me a REST API to my own body.

I use that REST API to make “glanceable displays” where I – or my family – can see my blood sugar quickly and easily.

I put my blood sugar in places like:

And today, on a tiny PyPortal device. The code is simple, noting that I don’t speak Python, so Pull Requests are always appreciated.

import time

import board
from adafruit_pyportal import PyPortal

# Set up where we'll be fetching data from
DATA_SOURCE = "https://NIGHTSCOUTWEBSITE/api/v1/entries.json?count=1"
BG_VALUE = [0, 'sgv']
BG_DIRECTION = [0, 'direction']

RED = 0xFF0000;
ORANGE = 0xFFA500;
YELLOW = 0xFFFF00;
GREEN = 0x00FF00;

def get_bg_color(val):
if val > 200:
return RED
elif val > 150:
return YELLOW
elif val < 60:
return RED
elif val < 80:
return ORANGE
return GREEN

def text_transform_bg(val):
return str(val) + ' mg/dl'

def text_transform_direction(val):
if val == "Flat":
return "→"
if val == "SingleUp":
return "↑"
if val == "DoubleUp":
return "↑↑"
if val == "DoubleDown":
return "↓↓"
if val == "SingleDown":
return "↓"
if val == "FortyFiveDown":
return "→↓"
if val == "FortyFiveUp":
return "→↑"
return val

# the current working directory (where this file is)
cwd = ("/"+__file__).rsplit('/', 1)[0]
pyportal = PyPortal(url=DATA_SOURCE,
json_path=(BG_VALUE, BG_DIRECTION),
status_neopixel=board.NEOPIXEL,
default_bg=0xFFFFFF,
text_font=cwd+"/fonts/Arial-Bold-24-Complete.bdf",
text_position=((90, 120), # VALUE location
(140, 160)), # DIRECTION location
text_color=(0x000000, # sugar text color
0x000000), # direction text color
text_wrap=(35, # characters to wrap for sugar
0), # no wrap for direction
text_maxlen=(180, 30), # max text size for sugar & direction
text_transform=(text_transform_bg,text_transform_direction),
)

# speed up projects with lots of text by preloading the font!
pyportal.preload_font(b'mg/dl012345789');
pyportal.preload_font((0x2191, 0x2192, 0x2193))
#pyportal.preload_font()

while True:
try:
value = pyportal.fetch()
pyportal.set_background(get_bg_color(value[0]))
print("Response is", value)
except RuntimeError as e:
print("Some error occured, retrying! -", e)
time.sleep(180)

I’ve put the code up at https://github.com/shanselman/NightscoutPyPortal. I want to get (make a custom?) a larger BDF (Bitmap Font) that is about twice the size AND includes 45 degree arrows ↗ and ↘ as the font I have is just 24 point and only includes arrows at 90 degrees. Still, great fun and took just an hour!

NOTE: I used the Chortkeh BDF Font viewer to look at the Bitmap Fonts on Windows. I still need to find a larger 48+ PT Arial.

What information would YOU display on a PyPortal?


Sponsor: Manage GitHub Pull Requests right from the IDE with the latest JetBrains Rider. An integrated performance profiler on Windows comes to the rescue as well.


© 2018 Scott Hanselman. All rights reserved.


from Scott Hanselman’s Blog http://feeds.hanselman.com/~/600168208/0/scotthanselman~Displaying-your-realtime-Blood-Glucose-from-NightScout-on-an-AdaFruit-PyPortal.aspx

F7 is the greatest PowerShell hotkey that no one uses any more. We must fix this.

Thousands of years ago your ancestors, and myself, were using DOS (or CMD) pressing F7 to get this amazing little ASCII box to pop up to pick commands they’d typed before.

Holy crap it's a little ASCII box

When I find myself in cmd.exe I use F7 a lot. Yes, I also speak *nix and Yes, Ctrl-R is amazing and lovely and you’re awesome for knowing it and Yes, it works in PowerShell.

Ctrl-R for history works in PowerShell

Here’s the tragedy. Ctrl-R for a reverse command search works in PowerShell because of a module called PSReadLine. PSReadLine is basically a part of PowerShell now and does dozens of countless little command line editing improvements. It also – not sure why and I’m still learning – unknowingly blocks the glorious F7 hotkey.

If you remove PSReadLine (you can do this safely, it’ll just apply to the current session)

Remove-Module -Name PSReadLine

Why, then you get F7 history with a magical ASCII box back in PowerShell. And as we all know, 4k 3D VR be damned, impress me with ASCII if you want a developer’s heart.

There is a StackOverflow Answer with a little PowerShell snippet that will popup – wait for it – a graphical list with your command history by calling

Set-PSReadlineKeyHandler -Key F7

And basically rebinding the PSReadlineKeyHandler for F7. PSReadline is brilliant, but I what I really want to do is to tell it to “chill” on F7. I don’t want to bind or unbind F7 (it’s not bound by default) I just want it passed through.

Until that day, I, and you, can just press Ctrl-R for our reverse history search, or get this sad shadow of an ASCII box by pressing “h.” Yes, h is already aliased on your machine to Get-History.

PS C:\Users\scott> h


  Id CommandLine

   — ———–

    1 dir

    2 Remove-Module -Name PSReadLine

Then you can even type “r 1” to “invoke-history” on item 1.

But I will still mourn my lovely ASCII (High ASCII? ANSI? VT100?) history box.


Sponsor: Manage GitHub Pull Requests right from the IDE with the latest JetBrains Rider. An integrated performance profiler on Windows comes to the rescue as well.


© 2018 Scott Hanselman. All rights reserved.


from Scott Hanselman’s Blog http://feeds.hanselman.com/~/600072732/0/scotthanselman~F-is-the-greatest-PowerShell-hotkey-that-no-one-uses-any-more-We-must-fix-this.aspx

Getting Started with .NET Core and Docker and the Microsoft Container Registry

It’s super easy to get started with .NET Core and/or ASP.NET Core with Docker. If you have Docker installed you don’t need to install anything to try out .NET Core, of course.

To run a little .NET Core console app:

docker run --rm mcr.microsoft.com/dotnet/core/samples:dotnetapp

And the result:

latest: Pulling from dotnet/core/samples

Hello from .NET Core!
...SNIP...

**Environment**
Platform: .NET Core
OS: Linux 4.9.125-linuxkit #1 SMP Fri Sep 7 08:20:28 UTC 2018

To run a quick little ASP.NET Core website just:

docker run -it --rm -p 8000:80 --name aspnetcore_sample mcr.microsoft.com/dotnet/core/samples:aspnetapp

And here it is running on localhost:8000

Simple ASP.NET Core app under Docker

You can also host ASP.NET Core Images with Docker over HTTPS to with this image, or run ASP.NET Core apps in Windows Containers.

Note that Microsoft teams are now publishing container images to the MCR (Microsoft Container Registry) so they can use the Azure CDN and pull faster when they are closer to you globally. The images start at MCR and then can be syndicated to other container registries.

The new repos follow:

When you “docker pull” you can use tag strings for .NET Core and it works across any supported .NET Core version

  • SDK: docker pull mcr.microsoft.com/dotnet/core/sdk:2.1
  • ASP.NET Core Runtime: docker pull mcr.microsoft.com/dotnet/core/aspnet:2.1
  • .NET Core Runtime: docker pull mcr.microsoft.com/dotnet/core/runtime:2.1
  • .NET Core Runtime Dependencies: docker pull mcr.microsoft.com/dotnet/core/runtime-deps:2.1

For example, I can run the .NET Core 3.0 SDK and mess around with it like this:

docker run -it mcr.microsoft.com/dotnet/core/sdk:3.0 

I’ve been using Docker to run my unit tests on my podcast site within a container locally. Then I volume mount and dump the test results out in a local folder and inspect them with Visual Studio

docker build --pull --target testrunner -t podcast:test .

docker run --rm -v c:\github\hanselminutes-core\TestResults:/app/hanselminutes.core.tests/TestResults podcast:test

I can then either host the Docker container in Azure App Service for Containers, or as little one-off per-second billed instances with Azure Container Instances (ACI).

Have you been using .NET Core in Docker? How has it been going for you?


Sponsor: Manage GitHub Pull Requests right from the IDE with the latest JetBrains Rider. An integrated performance profiler on Windows comes to the rescue as well.


© 2018 Scott Hanselman. All rights reserved.


from Scott Hanselman’s Blog http://feeds.hanselman.com/~/599966462/0/scotthanselman~Getting-Started-with-NET-Core-and-Docker-and-the-Microsoft-Container-Registry.aspx

What is Blazor and what is Razor Components?

I’ve blogged a little about Blazor, showing examples like Compiling C# to WASM with Mono and Blazor then Debugging .NET Source with Remote Debugging in Chrome DevTools as well as very early on asking questions like .NET and WebAssembly – Is this the future of the front-end?

Let’s back up and level-set.

What is Blazor?

Blazor is a single-page app framework for building interactive client-side Web apps with .NET. Blazor uses open web standards without plugins or code transpilation. Blazor works in all modern web browsers, including mobile browsers.

You write C# in case of JavaScript, and you can use most of the .NET ecosystem of open source libraries. For the most part, if it’s .NET Standard, it’ll run in the browser. (Of course if you called a Windows API or a Linux specific API and it didn’t exist in the client-side browser S world, it’s not gonna work, but you get the idea).

The .NET code runs inside the context of WebAssembly. You’re running “a .NET” inside your browser on the client-side with no plugins, no Silverlight, Java, Flash, just open web standards.

WebAssembly is a compact bytecode format optimized for fast download and maximum execution speed.

Here’s a great diagram from the Blazor docs.

Blazor runs inside your browser, no plugins needed

Here’s where it could get a little confusing. Blazor is the client-side hosting model for Razor Components. I can write Razor Components. I can host them on the server or host them on the client with Blazor.

You may have written Razor in the past in .cshtml files, or more recently in .razor files. You can create and share components using Razor – which is a mix of standard C# and standard HTML, and you can host these Razor Components on either the client or the server.

In this diagram from the docs you can see that the Razor Components are running on the Server and SignalR (over Web Sockets, etc) is remoting them and updating the DOM on the client. This doesn’t require Web Assembly on the client, the .NET code runs in the .NET Core CLR (Common Language Runtime) and has full compatibility – you can do anything you’d like as you are not longer limited by the browser’s sandbox.

Here's Razor Components running on the server

Per the docs:

Razor Components decouples component rendering logic from how UI updates are applied. ASP.NET Core Razor Components in .NET Core 3.0 adds support for hosting Razor Components on the server in an ASP.NET Core app. UI updates are handled over a SignalR connection.

Here’s the canonical “click a button update some HTML” example.

@page "/counter"


<h1>Counter</h1>

<p>Current count: @currentCount</p>

<button class="btn btn-primary" onclick="@IncrementCount">Click me</button>

@functions {
int currentCount = 0;

void IncrementCount()
{
currentCount++;
}
}

You can see this running entirely in the browser, with the C# .NET code running on the client side. .NET DLLs (assemblies) are downloaded and executed by the CLR that’s been compiled into WASM and running entirely in the context of the browser.

Note also that I’m stopped at a BREAKPOINT in C# code, except the code is running in the browser and mapped back into JS/WASM world.

Debugging Razor Components on the Client Side

But if I host my app on the server as hosted Razor Components, the C# code runs entirely on the Server-side and the client-side DOM is updated over a SignalR link. Here I’ve clicked the button on the client side and hit the breakpoint on the server-side in Visual Studio. No there’s no POST and no POST-back. This isn’t WebForms – It’s Razor Components. It’s a SPA app written in C#, not JavaScript, and I can change the locations of the running logic, while the UI remains always standard HTML and CSS.

Debugging Razor Components on the Server Side

It’s a pretty exciting time on the open web. There’s a lot of great work happening in this space and I’m very interesting to see how frameworks like Razor Components/Blazor and Phoenix LiveView change (or don’t) how we write apps for the web.


Sponsor: Manage GitHub Pull Requests right from the IDE with the latest JetBrains Rider. An integrated performance profiler on Windows comes to the rescue as well.


© 2018 Scott Hanselman. All rights reserved.


from Scott Hanselman’s Blog http://feeds.hanselman.com/~/599891564/0/scotthanselman~What-is-Blazor-and-what-is-Razor-Components.aspx

Python Web Scraping Tutorial

In this tutorial, we are going to talk about web scraping using python.

Firstly, we have to discuss about what is web scraping technique? Whenever we need the data (it can be text, images, links and videos) from web to our database. Lets discuss where we should need the web scraping in real world.

  1. Nowadays, we have so many competitors in each and every field for surpassing them we need their data from the website or Blogs to know about products, customers and their facilities.
  2. And Some Admin of Particular website, blogs and youtube channel want the reviews of their customers in database and want to update with this In, this condition they use web scraping

There are many other areas where we need web scraping, we discussed two points for precise this article for readers.

Prerequisites:

You just have basic knowledge of python nothing else so, get ready for learning web scraping.

Which technology we should use to achieve web scraping?

We can do this with JavaScript and python but according to me and most of the peoples, we can do it with python easily just you should know the basic knowledge of python nothing else rest of the things we will learn in this article.

Python Web Scraping Tutorial

1. Retrieving Links and Text from Website and Youtube Channel through Web Scraping

  • In this first point, we will learn how to get the text and the links of any webpage with some methods and classes.

We are going to do this beautiful soup method.

1. Install BS4 and Install lxml parser

  • To install BS4 in windows open your command prompt or windows shell and type: pip install bs4
  • To install lxml in windows open your command prompt or windows shell and type: pip install lxml

Note: “pip is not recognized” if this error occurs, take help from any reference.

To install BS4 in ubuntu open your terminal:

  • If you are using python version 2 type: pip install bs4
  • If you are using python version 3 type: pip3 install bs4  

To install lxml in ubuntu open your terminal

  • If you are using python version 2 type: pip install lxml
  • If you are using python version 3 type: pip3 install lxml

2. Open Pycharm and Import Modules

Import useful modules:

import bs4

import requests

Import useful modules

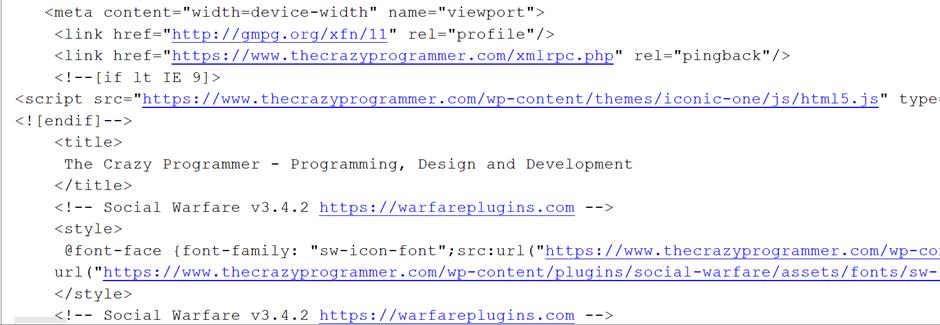
Then take url of particular website for example http://www.thecrazyprogrammer.com

url= "https://www.thecrazyprogrammer.com/"
data=requests.get(url)
soup=bs4.BeautifulSoup(data.text,'htm.parser')
print(soup.prettify())

And now you will get the html script with the help of these lines of code of particular link you provided to the program. This is the same data which is in the page source of the website webpage you can check it also.

Python Web Scraping Tutorial 1Python Web Scraping Tutorial 1

Now we talk about find function() with the help of find function we can get the text, links and many more things from our webpage. We can achieve this thing through the python code which is written below of this line:

We just take one loop in our program and comment the previous line.

for para in soup.find('p')
print(para)

Python Web Scraping Tutorial 2

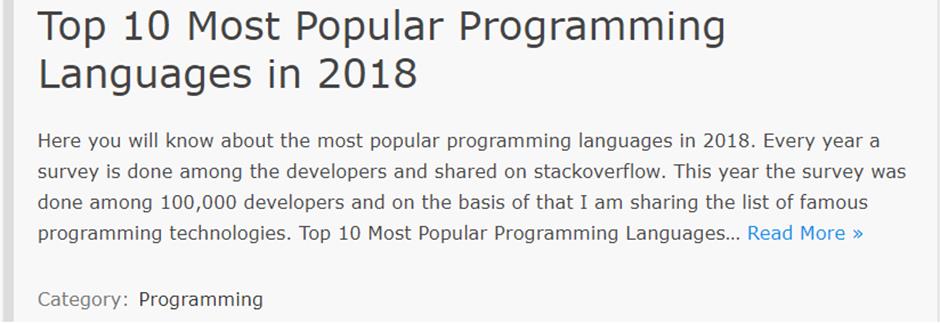
And we will get the first para of our webpage, you can see the output in the below image. See, this is the original website view and see the output of python code in the below image.

Python Web Scraping Tutorial 3

Pycharm Output

Python Web Scraping Tutorial 4

Now, if you want all the paragraph of this webpage you just need to do some changes in this code i.e.

Here, we should use find_all function() instead find function. Let’s do it practically

Python Web Scraping Tutorial 5

You will get all paragraphs of web page.

Now, one problem will occur that is the “<p>” tag will print with the text data for removing the <p> tag we have to again do changes in the code like this:

Python Web Scraping Tutorial 6

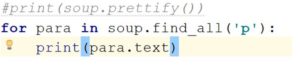
We just add “.text” in the print function with para. This will give us only text without any tags. Now see the output there <p> tag has removed with this code.

With the last line we have completed our first point i.e. how we can get the data (text) and the html script of our webpage. In the second point we will learn how we get the hyperlinks from webpage.

2. How to Get All the Links Of Webpage Through Web Scraping

Introduction:

In this, we will learn how we can get the links of the webpage and the youtube channels also or any other web page you want.

All the import modules will be same some changes are there only that changes are:

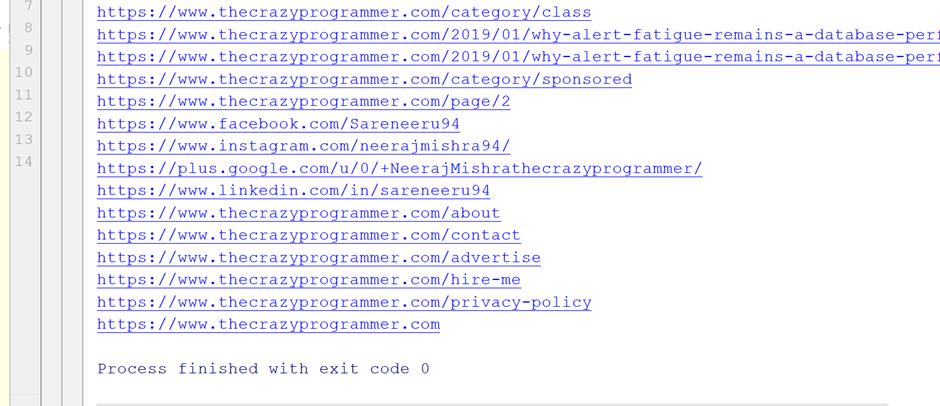
Take one for loop with the condition of anchor tag ‘a’ and get all the links using href tag and assign them to the object (you can see in the below image) which taken under the for loop and then print the object. Now, you will get all the links of webpage. Practical work:

Python Web Scraping Tutorial 7

You will get all the links with the extra stuff (like “../” and “#” in the starting of the link)

Python Web Scraping Tutorial 8

  • There is only some valid links in this console screen rest of them are also link but because of some extra stuff are not treating like links for removing this bug we have to do change in our python code.
  • We need if and else condition and we will do slicing using python also, “../” if we replace it with our url (you can see the url above images) i.e.  https://www.thecrazyprogrammer.com/, we will get the valid links of the page in output console let see practically in below image.

Python Web Scraping Tutorial 9

In the above image we take the if condition where the link or you can say that the string start with the “../” start with 3 position of the string using slice method and the extra stuff like “#” which is unuseful for us that’s why we don’t  include it in our output and we used the len() function also for printing the string to the last and with the prefix of our webpage url are also adding for producing the link.

In your case you can use your own condition according to your output.

Now you can see we get more than one link using if condition. We get so many links but there is also one problem that is we are not getting the links which are starting with “/” for getting these links also we have to do more changes in our code lets see what should we do.

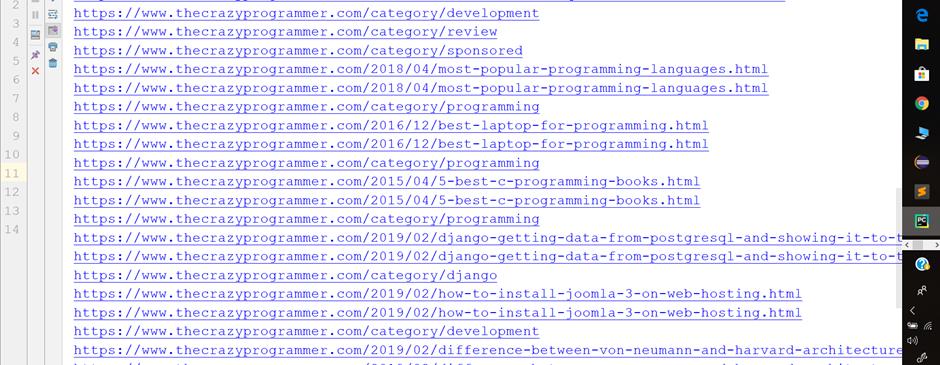
So, we have to add the condition elif also with the condition of “/” and here also we should give “#” condition also otherwise we will get extra stuff again in below image we have done this.

Python Web Scraping Tutorial 10

After putting this if and elif condition in our program to finding all the links in our particular webpage We have got the links without any error you can see in below image how we increased our links numbers since the program without the if and elif condition.

Python Web Scraping Tutorial 11

In this way we can get all the links the text of our particular page or website you can find the links in same manner of youtube channel also.

Note: If you have any problem to getting the links change the conditions in program as I have done with my problem you can use as your requirement.

So we have done how we can get the links of any webpage or youtube channel page.

3. Log In Facebook Through Web Scraping

Introduction

In this method we can login any account of facebook using Scraping.

Conditions: How we can use this scarping into facebook because the security of Facebook we are unable to do it directly.

So, we can’t login facebook directly we should do change in url of facebook like we should use m.facebook.com or mbasic.facebook.com url instead of http://www.facebook.com because facebook has high security level we can’t scrap data directly.

Let’s start scrapping.

This Is Webpage Of m.facebook.com URL

Let’s start with python. So first import all these modules:

import http.cookiejar

import urllib.request

import requests

import bs4

Then create one object and use cookiejar method which provides you the cookie into your python browser.

Create another object known as opener and assign the request method to it.

Note: do all the things on your risk don’t hack someone id or else.

Cj=http.cookiejar.Cookiejar()
Opener=urllib.request.build_opener(urllib.request.HTTPcookieProcessor)
Urllib.request.install_opener(opener)
Authentication_url=""

Python Web Scraping Tutorial 12

After this code, you have to find the link of particular login id through inspecting the page of m.facebook.com and then put the link into under commas and remove all the text after the login word and add “.php” with login word now type further code.
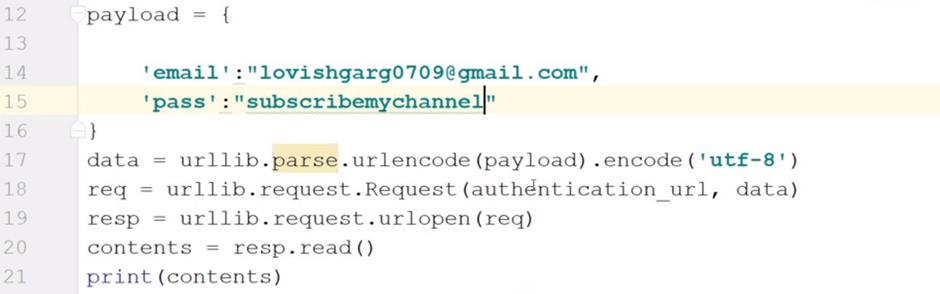
Python Web Scraping Tutorial 13

payload= {
	'email':"xyz@gmail.com",
	'pass':"(enter the password of id)"
}

After this use get function give one cookie to it.

Data=urllib.parse.urlencode(payload).encode('utf-8')
Req=urllib.request.Request(authentication_url,data)
Resp=urllib.request.urlopen(req)
Contents=resp.read()
Print(contents)

Python Web Scraping Tutorial 14

With this code we will login into facebook and the important thing I have written above also do it all things on your risk and don’t hack someone.

We can’t learn full concept of web scraping through this article only but still I hope you learned the basics of python web scrapping.

The post Python Web Scraping Tutorial appeared first on The Crazy Programmer.

from The Crazy Programmer https://www.thecrazyprogrammer.com/2019/03/python-web-scraping-tutorial.html

Tips for Secure Programming and Coding

While security has always been a concern for individuals and companies online, today this is more true now than ever. Hacks and data breaches are skyrocketing and hundreds of millions of people are being compromised every year. While this happens to big businesses, it can also happen to small entities or even individuals as well.

As a result, it is more important to ensure the code you or your company is writing remains secure. While it is impossible to avoid every potential attack, hack or data breach, you can try your best to prepare. While things such as testing frequently and using passwords can help, they are far from the only ways to secure your code. With that in mind, this article is going to look at a few tips for secure programming and coding.

Tips for Secure Programming and Coding

Utilize Log Management

Whether you have programmed an app or a piece of software, it is important to monitor it going forward after the initial coding is done. Without any sort of monitoring, you may not be any the wiser if someone hacks you. As a result, using a service or tool like log management and monitoring is important. Logs are a time-stamped documentation of events that are related to a particular system.

Log management allows you to analyze and store these logs and show you trends or events in the system. So if something unexpected occurs within your code or piece of software, you will be able to figure out where that occurred and what happened. As you could imagine, this is very helpful when it comes to both security and compliance.

There are many different log management platforms, tools, and services out there, so be sure to do some research to find the right one. Sites like DNSstuff offer reviews of different tools, so you can decide which is the right one for your needs.

Restrict Access

Restrict Access

While being liberal with handing out access can help ensure no roadblocks are encountered in the future, security is more important. Unfortunately, the more people that have access to your code, the higher the chance that something becomes compromised. This is because most data breaches are actually a result of human error, so be careful with how much access you provide to employees.

Only those who are actively working on the code should have access to it. Give people the smallest amount of access they need to do the job. There are a number of different ways you can control or restrict access. This gives data owners and businesses a lot of flexibility for choosing who they want to provide access to.

Consider Adding Delays to Code

While many people think of a hack or data breach involving a single individual trying to “crack the code,” this isn’t often the case. Oftentimes, these criminals will rely on powerful computers to relentlessly try and access your code, systems or files. They can do this either by continuously posing as a user trying to access or by trying billions of different password combinations.

One thing you can do to combat these efforts is to add some delays to your code. This delay will help slow these bots down to a half, without affecting the experience of actual humans. There are different ways you can do this, such as adding slight delay with each incorrect log-in attempt.

Hopefully, this article has been able to help you learn how to program and code in a more secure manner. Protecting your code and making sure it works and is secure is paramount to being successful in the space.

The post Tips for Secure Programming and Coding appeared first on The Crazy Programmer.

from The Crazy Programmer https://www.thecrazyprogrammer.com/2019/03/tips-for-secure-programming-and-coding.html

Xbox Avatar accessories for People with Diabetes! Sponsored by Nightscout and Konsole Kingz

My Xbox user name is Glucose for a reason.

This is a passion project of mine. You’ve likely seen me blog about diabetes for many many years. You may have enjoyed my diabetes hacks like lighting up my keyboard keys to show me my blood sugar, or some of the early work Ben West and I did to bridge Dexcom’s cloud with the NightScout open source diabetes management system.

Recently Xbox announced new avatars! They look amazing and the launch was great. They now have avatars in wheelchairs, ones with artificial limbs, and a wide variety of hair and skin tones. This is fantastic as it allows kids (and adults!) to be seen and be represented in their medium of choice, video games.

I was stoked and immediately searched the store for “diabetes.” No results. No pumps, sensors, emotes, needles, nothing. So I decided to fix it.

NOW AVAILABLE: Go and buy the Nightscout Diabetes CGM avatar on the Xbox Store now!

I called two friends – my friends at the Nightscout Foundation, dedicated to open source and open data for people with diabetes, as well as my friends at Konsole Kingz, digital avatar creators extraordinaire with over 200 items in the Xbox store from kicks to jerseys and tattoos.

And we did it! We’ve added our first diabetes avatar top with some clever coding from Konsole Kingz, it is categorized as a top but gives your avatar not only a Nightscout T-Shirt with your choice of colors, but also a CGM (Continuous Glucose Meter) on your arm!

Miss USA has a CGMFor most diabetics, CGMs are the hardware implants we put in weekly to tell us our blood sugar with minimal finger sticks. They are the most outwardly obvious physical manifestation of our diabetes and we’re constantly asked about them. In 2017, Miss USA contestant Krista Ferguson made news by showing her CGM rather than hiding it. This kind of visible representation matters to kids with diabetes – it tells them (and us) that we’re OK.

You can find the Nightscout CGM accessory in a nuimber of ways. You can get it online at the Xbox Avatar shop, and when you’ve bought it, it’ll be in the Purchased Tab of the Xbox Avatar Editor, under Closet | Tops.

You can even edit your Xbox Avatar on Windows 10 without an Xbox! Go pick up the Xbox Avatar Editor and install it (on both your PC and Xbox if you like) and you can experiment with shirt and logo color as well.

Consider this a beta release. We are working on improving resolution and quality, but what we really what to know is this – Do you want more Diabetes Xbox Avatar accessories? Insulin pumps on your belt? An emote to check your blood sugar with a finger stick?

Diabetes CGM on an Xbox avatar

If this idea is a good one and is as special to you and your family (and the gamers in your life with diabetes) please SHARE it. Share it on social media, tell your friends at the news. Profits from this avatar item will go to the Nightscout Foundation!


Sponsor: Manage GitHub Pull Requests right from the IDE with the latest JetBrains Rider. An integrated performance profiler on Windows comes to the rescue as well.


© 2018 Scott Hanselman. All rights reserved.


from Scott Hanselman’s Blog http://feeds.hanselman.com/~/599636766/0/scotthanselman~Xbox-Avatar-accessories-for-People-with-Diabetes-Sponsored-by-Nightscout-and-Konsole-Kingz.aspx

OpenVPN vs PPTP vs L2TP – VPN Protocols Comparison

You realize that you need a VPN. The decision that you have to make is if you want to set up a VPN or if you want to use a VPN provider. If you go the provider route, the provider may ask you to choose the protocol you want. Or if you set up a VPN, you need to know which protocol you will use. In this article we are going to take a look at some of the more popular protocol standards to help you get an idea of which one you should consider using.

VPN

Image Source

PPTP

This is a popular standard for VPN connections. It’s going to be difficult for you to find a VPN provider that does not offer PPTP connections. PPTP is Point-To-Point Tunneling Protocol. This VPN protocol first came on the scene back in 1995, although its development dates back more than a decade before it’s public release.

PPTP was designed based on the previous PPP standard. The PPP standard did not have a safe tunneling feature. When it was first introduced, PPTP was a Windows system protocol. However, it quickly became popular as a VPN protocol being used on a variety of platforms.

As a VPN protocol, PPTP laid out the guidelines that guaranteed that VPN client to VPN server communications were secure and were handled correctly.

With PPTP, the client creates a connection known as the tunnel. All of your online data and online traffic travels through this tunnel where it is secured and encrypted simultaneously. It is able to create a secure server connection with only the server address, password, and username. PPTP works across a number of platforms. It can be used on multiple operating systems and devices. PPTP will use General Routing Encapsulation, IP port 47 and TCP port 1723.

PPTP supports voluntary tunneling as well as compulsory tunneling. Voluntary tunneling is where the tunneling is initiated by the client. This means that ISP bridge support is not needed. Compulsory tunneling is where the tunneling is initiated by the PPTP server. Therefore, network access server support and broader access service support is required.

PPTP

PPTP was considered to be exceptionally secure. That is not the case today. There is documentation to support the fact that agencies working with the US government, including the NSA, have been able to crack PPTP traffic. This, along with other known security vulnerabilities, makes PPTP a prime target for hackers.

PPTP makes it possible to have a fast connection. This allows you to use a VPN without significantly lowering your online speeds. For a simplified explanation of how VPNs work check this.

OpenVPN

OpenVPN

OpenVPN creation stems back to the year 2002. It was initially founded by James Yonan. This protocol has become exceptionally popular because it supports the major operating systems, including Linux, Windows, and Mac OS. It also works well with mobile platforms, including Android and iOS.

The reason why a person wants a VPN security protocol is because they want a high level of security. OpenVPN excels at this. One of the reasons is its 256 bit encryption thanks to OpenSSL. OpenVPN is not only secure, but it is also flexible and works well with third-party software. There are a number of OpenVPN providers that use this protocol to make commercially available VPNs for clients and users.

OpenVPN can take advantage of two different protocols, which are UDP and TCP. TCP, also known as Transmission Control Protocol, is popular and commonly used thanks to its dependability, reliability, and ability to correct errors.

OpenVPN is a protocol that is commonly used to bypass encryption firewalls. One of the great examples of this is the Great Firewall in China. The OpenVPN protocol has been able to circumnavigate DPI, also known as Deep Packet Inspection, which is commonly used in China. DPI is a monitoring technology that is designed to inspect passing traffic in real-time. However, OpenVPN can cloak traffic.

One of the biggest benefits of OpenVPN is the fact that it is open source. Other VPN protocols are owned by mega companies. The OpenVPN protocol is open, freely available for modification, and is backed by a large community that is active in filing bug reports, allowing developers to improve the source code as well as to create regular updates.

L2TP

L2TP

L2TP also known as Layer 2 Tunnel Protocol. It is a VPN protocol that does not have encryption. That’s why you will commonly see it referred to as L2TP/IPsec, with the IPsec providing the encryption. L2TP protocol is built into most desktop operating systems as well as the operating systems of mobile devices. This makes it relatively easy to implement.

A downside is that since it uses UDP port 500, L2TP cannot be disguised on other ports like you can with OpenVPN. As a result, L2TP is a lot easier to block and is not as effective at getting around firewalls as other forms of VPN protocols.

In theory, IPsec should be secure. However, it is rumored that the NSA has weakened this encryption standard. Of course, there’s no way to know for sure. However, you couple this with the fact that L2TP is a slower protocol because the traffic must first be converted into L2TP and then encrypted with IPsec and it is clear to see why this is not the fastest VPN protocol on the market.

Which Option Is Best?

The answer is going to vary depending on why you want to use the VPN. However:

  • OpenVPN is generally considered to be your best bet. This is the same protocol used for most free VPNs. It is fast, secure, and flexible. It is going to work for you regardless of the operating system you use or the platform you use.
  • PPTP is going to be easy for you to set up, and it is going to give you a fast connection. That being said, it is insecure.
  • L2TP/IPSec is an improvement from PPTP. But since it is a two-step process, it is slower and the security of it is questionable.

Which protocol do you use for your VPN? We would love to hear from you. Let us know your thoughts the comment section below.

The post OpenVPN vs PPTP vs L2TP – VPN Protocols Comparison appeared first on The Crazy Programmer.

from The Crazy Programmer https://www.thecrazyprogrammer.com/2019/03/openvpn-vs-pptp-vs-l2tp.html

How to stream PC games from Windows 10 to your Xbox One for free

Xbox is ready for you to connect to wirelesslyI’ve been really enjoying my Xbox lately (when the family is asleep) as well as some fun Retrogaming on the original consoles. Back in 2015 I showed how you can stream from your Xbox to any PC using the Xbox app from the Windows Store. You can pair your Xbox controller with any PC you’ve got around (either with the $20 Xbox Wireless Adapter or just with a micro-USB cable you likely have lying around). In fact, I often walk on the treadmill while streaming games from the Xbox to my little Surface Pro 3.

Then, a year later I did the inverse. I played PC games on my big screen using a SteamLink (although they’ve been discontinued, they are out there and they work great.) This little box lets you play PC games remotely on your large screens. I have a big PC in my office and I wanted to use the big TV in the living room. The game runs on the PC but the video/audio and controls are all remoted to the Xbox. Plus, SteamLink only works with the Steam app running and is optimized for Steam games.

Fast forward to today and I learned that Windows 10 can project its screen to an Xbox One AND you can use your Xbox One controller to control it (it’s paired on the Xbox side) and play games or run apps.

I installed the Xbox Wireless Display App on my Xbox One. Then on my PC, here’s what I see upon just doing Win+P and clicking “Connect to Wireless Display.”

Connected to Xbox One

Once I’ve duplicated, you can see here I’m writing this blog post wirelessly projected to the Xbox. It just worked. Took 5 min to do this.

If you’re tech savvy, you may see, isn’t this “just Miracast” and “hasn’t this always been possible?” Yes and no. What’s been updated is the Xbox Wireless Display App that you’ll want to install and run on your Xbox. You may have been able to project your PC screen to various sticks and Miracast adapters, but this free app makes your Xbox a receiver for Miracast broadcasts (over wifi or LAN) and most importantly – now you can use your Xbox controller already paired to the Xbox to control the remote PC. You can use that control to play games or switch to mouse control mode with Start+Select and mouse around with your Xbox thumbsticks!

20190315_050720572_iOS

If I hit the menu button I can see how the controllers map to PC controls. No remote keyboard and mouse connected from the Xbox…yet. (and to be clear, no word if that will ever be supported but it’d be cool!)

Controller Mapping for PC to Xbox

To make sure you can do this, run DxDiag and save all information into “DxDiag.txt.” Here’s part of mine. There’s nothing special about my machine. It’s worth pointing out I have no Wifi adapter on this machine and it has an NVidia 1080 video card. Miracast is happening over the Wired LAN (local area network) in my house. This is Miracast over Infrastructure and it’s in Windows 10 since version 1703 (March 2017).

------------------

System Information
------------------
Machine name: IRONHEART
Operating System: Windows 10 Pro 64-bit
Processor: Intel(R) Core(TM) i9-7900X CPU @ 3.30GHz (20 CPUs), ~3.3GHz
Memory: 32768MB RAM
DirectX Version: DirectX 12
User DPI Setting: 144 DPI (150 percent)
System DPI Setting: 144 DPI (150 percent)
Miracast: Available, with HDCP

When you’ve connected your PC to my Xbox and are streaming FROM my PC to your Xbox, you’ll see this bar at the top of the PC side. There’s three optimization settings for Gaming, Working, and Watching Videos. I assume these are balancing crispness/quality with framerate and latency changes.

Gaming, Working, Watching Videos

Now let’s take it to the next level. I can run Steam Big Picture and here I am running Batman: Arkham Origins on my PC, but played on and controlled from my Xbox in the other room!

I like that I don’t need the SteamLink. I find that this runs more reliably and more easily than my original set up. I like that I can switch the Xbox controller from controller mode to mouse mode. And most of all I like that this doesn’t require any custom setup, extra work, or drivers. It just worked out of the box for me.

Your mileage may vary and I’m trying to figuire out why some people’s video card drivers don’t allow this and then end up with no “Connect to a Wireless Display” option in their Win+P menu. If you figure it out, please sound of in the comments.

Give it a try! I hope you enjoy it. I’m having a blast.


Sponsor: Manage GitHub Pull Requests right from the IDE with the latest JetBrains Rider. An integrated performance profiler on Windows comes to the rescue as well.


© 2018 Scott Hanselman. All rights reserved.


from Scott Hanselman’s Blog http://feeds.hanselman.com/~/599596838/0/scotthanselman~How-to-stream-PC-games-from-Windows-to-your-Xbox-One-for-free.aspx

Design a site like this with WordPress.com
Get started