New prescriptive guidance for Open Source .NET Library Authors

Open-source library guidanceThere’s a great new bunch of guidance just published representing Best Practices for creating .NET Libraries. Best of all, it was shepherded by JSON.NET’s James Newton-King. Who better to help explain the best way to build and publish a .NET library than the author of the world’s most popular open source .NET library?

Perhaps you’ve got an open source (OSS) .NET Library on your GitHub, GitLab, or Bitbucket. Go check out the open-source library guidance.

These are the identified aspects of high-quality open-source .NET libraries:

  • Inclusive – Good .NET libraries strive to support many platforms and applications.
  • Stable – Good .NET libraries coexist in the .NET ecosystem, running in applications built with many libraries.
  • Designed to evolve – .NET libraries should improve and evolve over time, while supporting existing users.
  • Debuggable – .NET libraries should use the latest tools to create a great debugging experience for users.
  • Trusted – .NET libraries have developers’ trust by publishing to NuGet using security best practices.

The guidance is deep but also preliminary. As with all Microsoft Documentation these days it’s open source in Markdown and on GitHub. If you’ve got suggestions or thoughts, share them! Be sure to sound off in the Feedback Section at the bottom of the guidance. James and the Team will be actively incorporating your thoughts.

Cross-platform targeting

Since the whole point of .NET Core and the .NET Standard is reuse, this section covers how and why to make reusable code but also how to access platform-specific APIs when needed with multi-targeting.

Strong naming

Strong naming seemed like a good idea but you should know WHY and WHEN to strong name. It all depends on your use case! Are you publishing internally or publically? What are your dependencies and who depends on you?

NuGet

When publishing on the NuGet public repository (or your own private/internal one) what do you need to know about SemVer 2.0.0? What about pre-release packages? Should you embed PDBs for easier debugging? Consider things like Dependencies, SourceLink, how and where to Publish and how Versioning applies to you and when (or if) you cause Breaking changes.

Also be sure to check out Immo’s video on “Building Great Libraries with .NET Standard” on YouTube!


Sponsor: Check out the latest JetBrains Rider with built-in spell checking, enhanced debugger, Docker support, full C# 7.3 support, publishing to IIS and more advanced Unity support.


© 2018 Scott Hanselman. All rights reserved.


from Scott Hanselman’s Blog http://feeds.hanselman.com/~/574981582/0/scotthanselman~New-prescriptive-guidance-for-Open-Source-NET-Library-Authors.aspx

C# and .NET Core scripting with the “dotnet-script” global tool

dotnet scriptYou likely know that open source .NET Core is cross platform and it’s super easy to do “Hello World” and start writing some code.

You just install .NET Core, then “dotnet new console” which will generate a project file and basic app, then “dotnet run” will compile and run your app? The ‘new’ command will create all the supporting code, obj, and bin folders, etc. When you do “dotnet run” it actually is a combination of “dotnet build” and “dotnet exec whatever.dll.”

What could be easier?

What about .NET Core as scripting?

Check out dotnet script:

C:\Users\scott\Desktop\scriptie> dotnet tool install -g dotnet-script

You can invoke the tool using the following command: dotnet-script
C:\Users\scott\Desktop\scriptie>copy con helloworld.csx
Console.WriteLine("Hello world!");
^Z
1 file(s) copied.
C:\Users\scott\Desktop\scriptie>dotnet script helloworld.csx
Hello world!

NOTE: I was a little tricky there in step two. I did a “copy con filename” to copy from the console to the destination file, then used Ctrl-Z to finish the copy. Feel free to just use notepad or vim. That’s not dotnet-script-specific, that’s Hanselman-specific.

Pretty cool eh? If you were doing this in Linux or OSX you’ll need to include a “shebang” as the first line of the script. This is a standard thing for scripting files like bash, python, etc.

#!/usr/bin/env dotnet-script

Console.WriteLine("Hello world");

This lets the operating system know what scripting engine handles this file.

If you you want to refer to a NuGet package within a script (*.csx) file, you’ll use the Roslyn #r syntax:

#r "nuget: AutoMapper, 6.1.0"

Console.WriteLine("whatever);

Even better! Once you have “dotnet-script” installed as a global tool as above:

dotnet tool install -g dotnet-script

You can use it as a REPL! Finally, the C# REPL (Read Evaluate Print Loop) I’ve been asking for for only a decade! 😉

C:\Users\scott\Desktop\scriptie>dotnet script

> 2+2
4
> var x = "scott hanselman";
> x.ToUpper()
"SCOTT HANSELMAN"

This is super useful for a learning tool if you’re teaching C# in a lab/workshop situation. Of course you could also learn using http://try.dot.net in the browser as well.

In the past you may have used ScriptCS for C# scripting. There’s a number of cool C#/F# scripting options. This is certainly not a new thing:

In this case, I was very impressed with the easy of dotnet-script as a global tool and it’s simplicity. Go check out https://github.com/filipw/dotnet-script and try it out today!


Sponsor: Check out the latest JetBrains Rider with built-in spell checking, enhanced debugger, Docker support, full C# 7.3 support, publishing to IIS and more advanced Unity support.


© 2018 Scott Hanselman. All rights reserved.


from Scott Hanselman’s Blog http://feeds.hanselman.com/~/574796662/0/scotthanselman~C-and-NET-Core-scripting-with-the-dotnetscript-global-tool.aspx

Using Enhanced Mode Ubuntu 18.04 for Hyper-V on Windows 10

I run Windows as my daily driver but I use WSL (Windows Subsystem for Linux) all day long but WSL is just the command-line and has some perf issues with heavy file system work. I use Docker for Windows which works amazingly and has it good perf but sometimes I want to test on a full Ubuntu Desktop.

ASIDE: No joke. My Linux/Ubuntu bona fides go back a while. Here’s me installing Ubuntu 10.4 on Windows 7 over 8 years ago. Umuntu ngumuntu ngabantu!

To be frank, historically Ubuntu has sucked on Window’s Hyper-V. If you wanted to get a higher (read: usable) resolution it would take a miracle. If you wanted shared clipboards or shared disk drives, well, again, miracle or a ton of manual set up. It’s possible but it’s not fun.

Why can’t it be easy? Well, it is. I installed the Windows 10 “Fall Creators Update” – yes the name is stupid. It’s Windows 10 “1809” – that’s 2018 and the 9th month. Just type “Winver” from the Start menu. You may have “1803” from March. Go update.

Windows 10 includes Hyper-V Quick Create which has this suspiciously short list under “Select an operating system.” Anytime a list has 1 or 2 items and some whitespace that means it will someday have n+1 list items.

Recently Ubuntu 18.04.1 LTS showed up in this list. You can quickly and easily create an Ubuntu VM from here and it’s all handled, downloading, network switch, VM create, etc.

Create Virtual Machine

I dig it. So click create, start it up…get to the set up screen. Now, here, make sure you click “Require my password to login.” What we want to do won’t work with “Log in Automatically” and you don’t want that anyway.

Setting up an Ubuntu VM

After you’ve created your VM and got it mostly setup, close the Hyper-V client window. Just X it out. The VM is still running of course.

Go over to Hyper-V Manager and right click on it and “Connect.”

Connect to VM

You’ll see a resolution dialog…pick one! Go crazy! Do be aware that there are issues on 4k display but you can adjust within Ubuntu itself.

Set Resolution

Now, BEFORE you click Connect, click “Show Options” and then “Local Resources.” Under here, uncheck Smart Cards and Check “Drives.”

Uncheck Smart Cards and Check Drives

Click OK and Connect…and you get this weird dialog! You’re actually RDP’ing into Ubuntu! Rather than using the historical weird Hyper-V Client stuff to talk to Ubuntu and struggle with video cards and resolutions, here you are literally just Remote Desktoping into Ubuntu using integrated open source xrdp!

Login with your name and password (remember before when I said don’t automatically login? This is why.)

Login to xrdp

What about Dynamic Resizing?

Here’s an even better possible future. What we REALLY want (don’t we, Dear Reader) is Dynamic Resolution and Resizing without Reconnection! Today you can just close and reconnect to change resolutions but I’d love to just resize the Ubuntu window like I do Windows 7/8/10 VM client windows.

The feature “Dynamic resolution update” was introduced in RDP 8.1. It enables to resize screen resolution on-the-fly.

Since we are using xrdp and that’s open source over https://github.com/neutrinolabs/xrdp/ AND there’s even a issue about this AND a lovely person has the code in their own branch and agreed to possibly upstream it maybe we can start using it and this great feature will just light up for folks who use Hyper-V Quick Create. Certainly we’re talking weeks and months here (unless you want to help) but the lion’s share of the work is done. I’m looking forward to resizing Ubuntu VMs dynamically.

What’s in Enhanced Mode Today?

Back to today! You can read about how Linux VMs (Ubuntu or Arch) are set up in this GitHub repo https://github.com/Microsoft/linux-vm-tools You can set them up yourself with scripts, but the nice thing about Hyper-V Quick Create is that the work is done for us to make these “enhanced session” RDP-friendly VMs. No need to fear, you can just read the scripts yourself.

I can connect quickly and Enhanced Mode VMs give me:

  • a shared clipboard
  • the resolution of my choice on connect
  • fast painting/video/scrolling
  • automatic shared-drives
  • Smooth and automatic mouse capture

Fantastic.

Ubuntu on Windows 10

What about installing Visual Studio Code? Of course. And also .NET Core.NET Core, natch.

image

This took like 10 min and 8 of it was waiting for Hyper-V Create to download Ubuntu. Try it out!


Sponsor: Check out the latest JetBrains Rider with built-in spell checking, enhanced debugger, Docker support, full C# 7.3 support, publishing to IIS and more advanced Unity support.


© 2018 Scott Hanselman. All rights reserved.


from Scott Hanselman’s Blog http://feeds.hanselman.com/~/574544624/0/scotthanselman~Using-Enhanced-Mode-Ubuntu-for-HyperV-on-Windows.aspx

Django Custom Webpage

In this tutorial, we’re going to create our first custom webpage in django. The main goal of this article for you to understand the whole flow of information in django website like if someone asks for specific url then how do we route them into the correct places and ultimately give them back some HTML.

So before starting this article I am assuming that you’ve started the local server using python3 manage.py runserver command in project directory.

We’ve seen that whenever we create a project and run it in browser then django’s default page shows up.

Django Custom Webpage 1

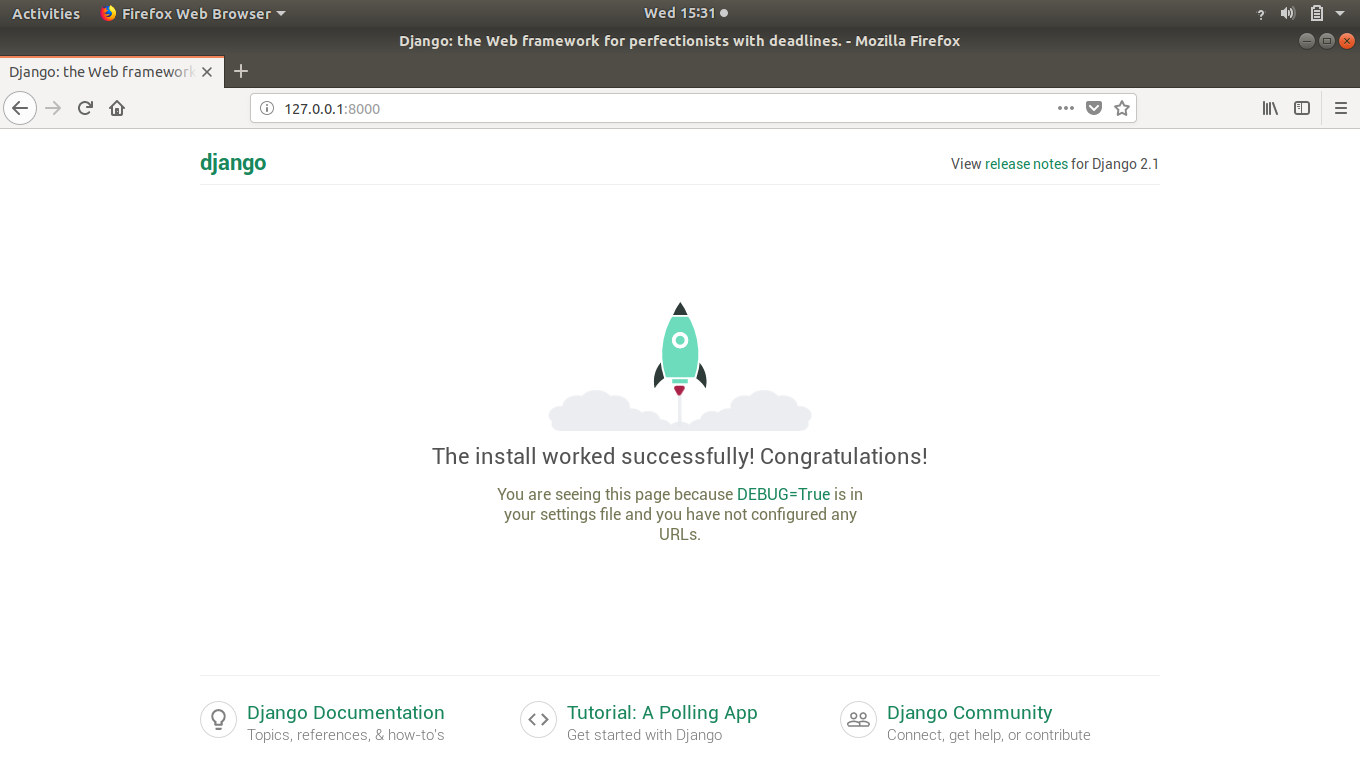
That’s isn’t our creation right.

So let’s see how to create our own webpage in django.

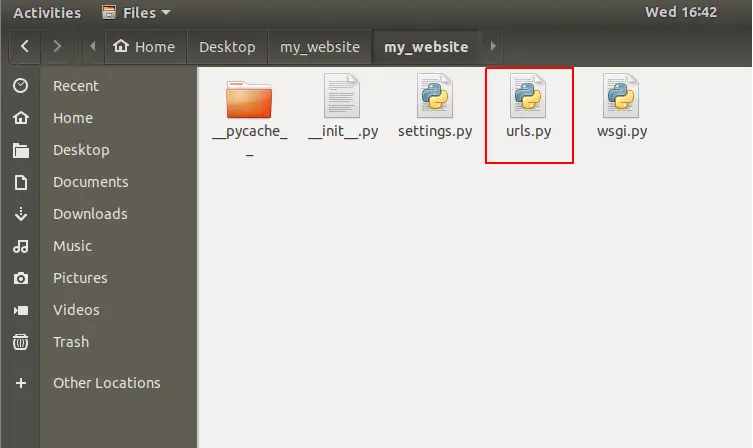
In previous articles, we’ve seen that anytime someone is looking for a URL on our website it comes to this “urls.py”.

Django Custom Webpage 2

Django Custom Webpage 3

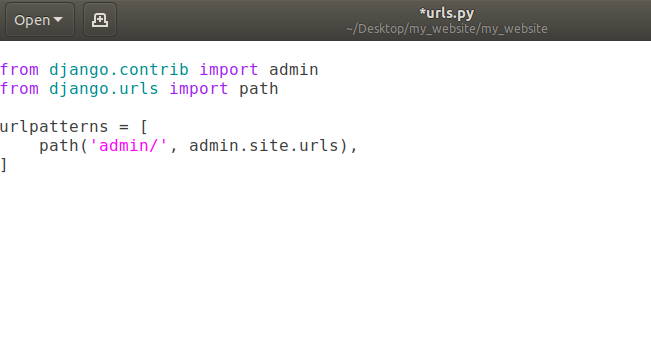
Currently we’ve path of admin/ in the list urlpatterns. That means when user goes to our website (currently = http://127.0.0.1:8000/)  and add a /admin in the url, user will be redirected to admin page of our django website.

Django Custom Webpage 4

Note: That domain-name/admin (currently domain-name is http://127.0.0.1:8000/) is going to help us eventually work with the database but we don’t really need to worry about that right now.

How to Change URL of Existing Webpages

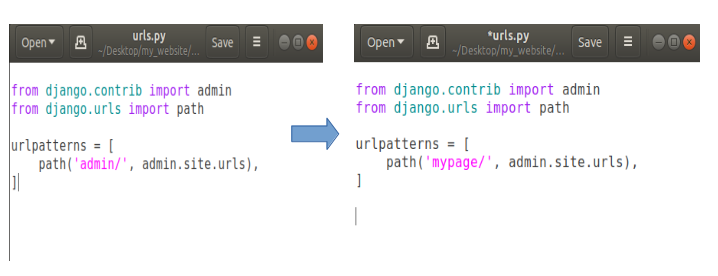
Let’s say we want to change the URL for our admin page then we can modify our urls.py file like this:

Django Custom Webpage 5

Now open your web browser and open domain-name/admin (http://127.0.0.1:8000/admin)

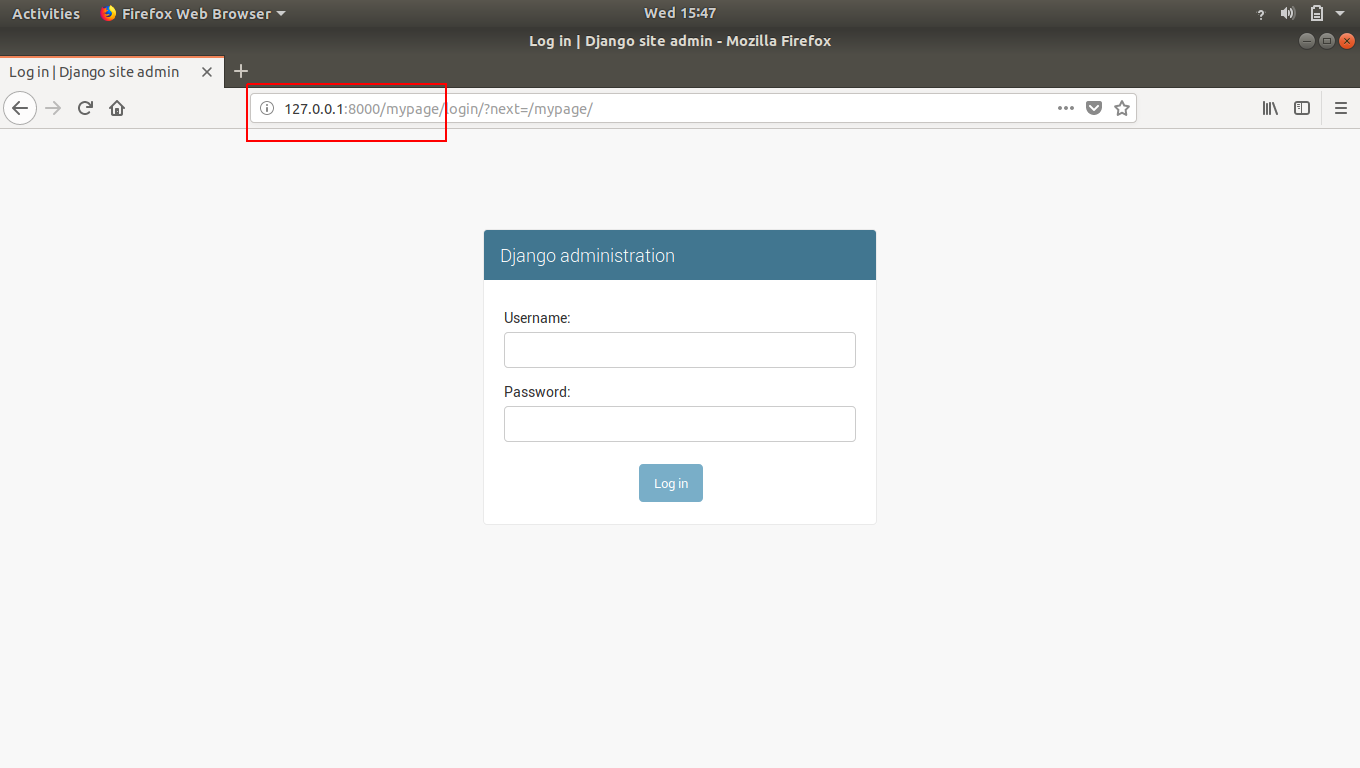
The result will be an error showing that page can not be found or something like this because we have changed the address of our admin page. So our new address is doman-name/mypage (http://127.0.0.1:8000/mypage). Open this address and the result will be:

Django Custom Webpage 6

That how we can change any existing web-page’s URL.

Note: In django, anytime you make a change to a file, it is going to auto-reload the server for you. So we don’t have to manually go back to stop and start the server to pick-up the new changes.

Creating Our Own Custom Webpage in Django

Now our task is to make our own custom webpage so let’s do it.

Firstly, we don’t need that admin page so delete that path entirely.

Django Custom Webpage 7

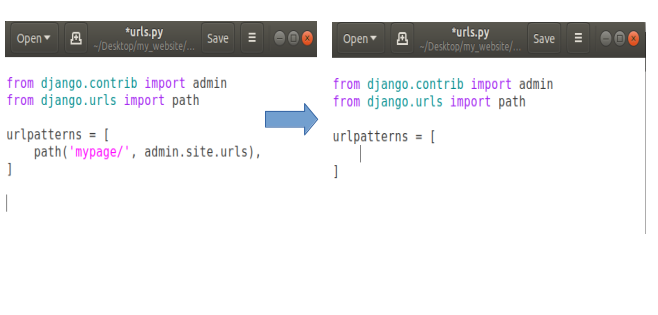
In fact we can delete the first line about admin in our urls.py as we don’t need admin anymore.

Django Custom Webpage 8

Now let’s say we’re going to add a path for our own page. Let’s say homepage. So when someone comes to the homepage of our website then we’ll show them our own custom homepage instead of that default django template page.

To do this, open your urls.py and add a new path. Basically if someone comes to our homepage means they don’t need to any thing extra our domain-name (http://127.0.0.1:8000/), so we’ll put a empty string in path, like this:

Django Custom Webpage 9

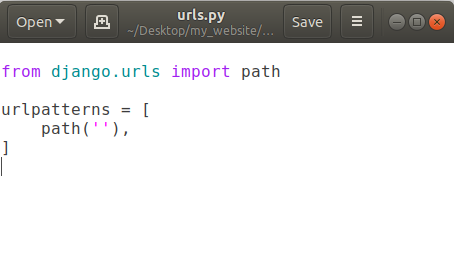
Now in path put a comma after the empty string and after comma (,) we’ll add another thing that will show that when someone comes to our homepage then where we want to send the user to.

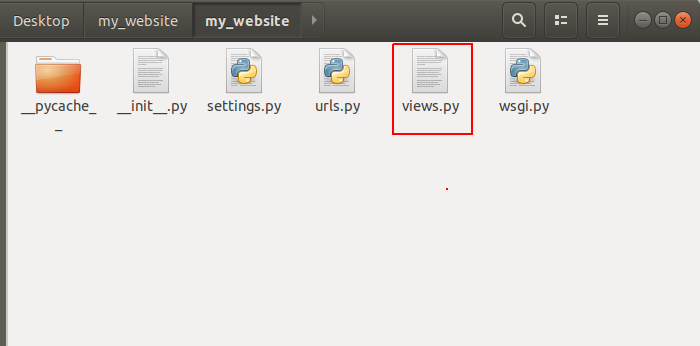
Here we have to create a new file called views.py which essentially allows us to send back some information.

So we’ll create a new file in same directory where our urls.py exists. Now we’ve a new file called views.py here:

Django Custom Webpage 10

To use views.py into our urls.py, we’ve to import views.py in urls.py file. So open urls.py and add the following line:

Django Custom Webpage 11

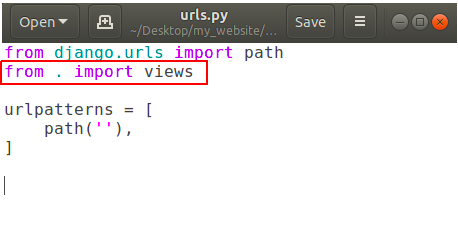
In above picture dot (.) means current directory.

Now add a function to call in our path into urls.py.

Django Custom Webpage 12

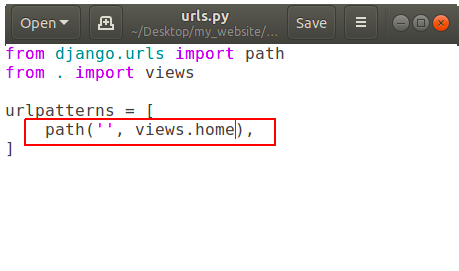
It is showing that if someone goes to our homepage then call the function ‘home’ which is located in our views.py, but we don’t have any function called home in our views.py yet.

So let’s create it. Open views.py and add a new function called home.

Django Custom Webpage 13

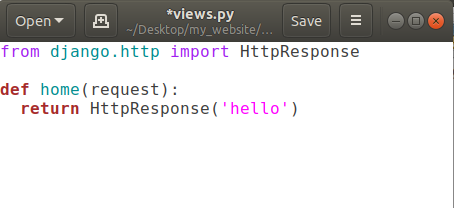
Here we’ve to pass request parameter in home function, anytime someone is coming for URL of our website it sends this request object which basically says that what’s the url they looking for and some more advanced information like some cookies and what browser they are using. So that type of information comes through this request object.

Then we’re returning something back to the user using return keyword But we can’t return a simple string back from our function, we’ve to give back an HTTP response. So in order to do that we’ve to use function HttpResponse(string) and to use HttpsResponse(string) we’ve to import some package using

from django.http import HttpResponse

Now save this file and reload your website. The output will be:

Django Custom Webpage 14

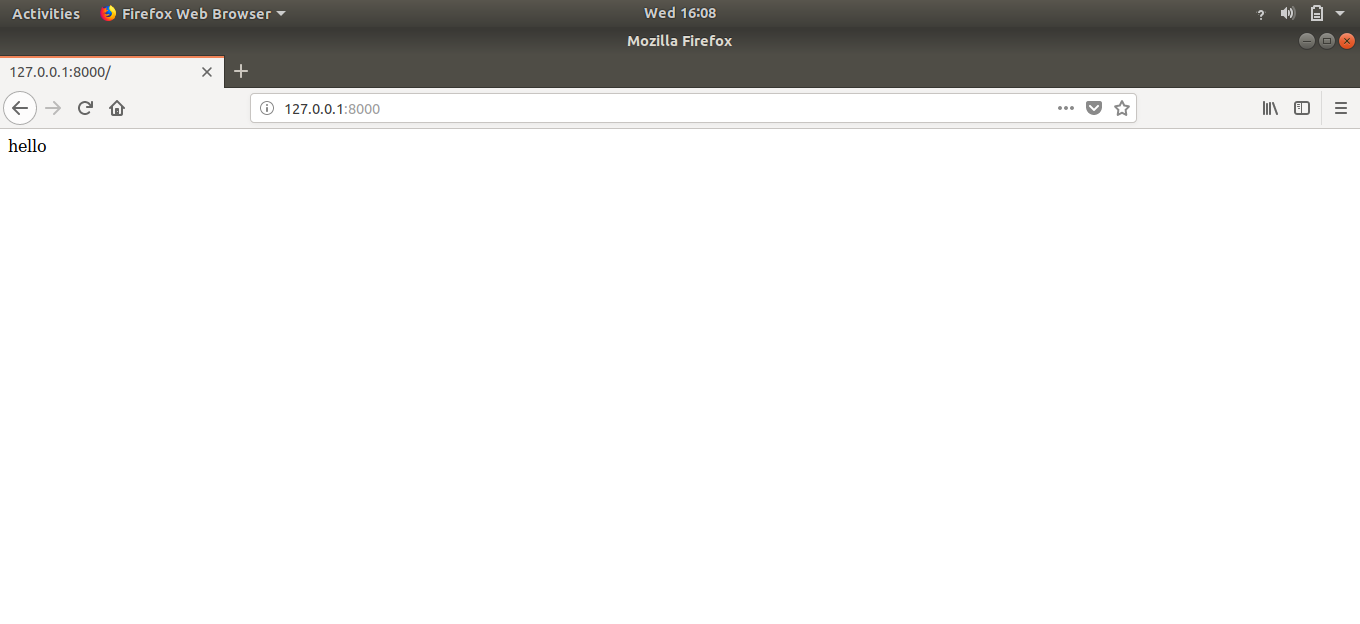
Congratulations, we have our own creation on our homepage.

Flow of Information in Our Django Website

If somebody is opening our website’s homepage (http://127.0.0.1:8000/) then they will be redirected to our urls.py file. Urls.py check the entered url by the user. As there is no extra string after the domain-name in above example. So in urlpatterns, it will check for the empty string and as we’ve one path having an empty string, it will be redirected to the function written in path with empty string, that is views.home in our case. Now that home function in views.py is finally returning some HttpsResponse that is ‘hello’. So user have the information that he/she requested for.

That’s how the flow of information works in django.

Creating Multiple Webpages in Django

As we make one custom webpage, we can also add some more web-pages having unique addresses assigned to them.

Open urls.py  and add a new path like:

Django Custom Webpage 15

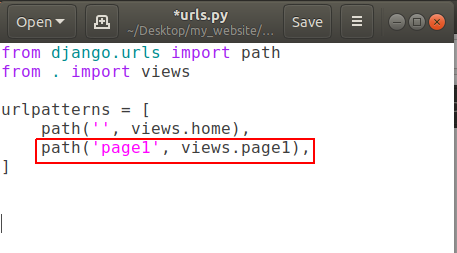
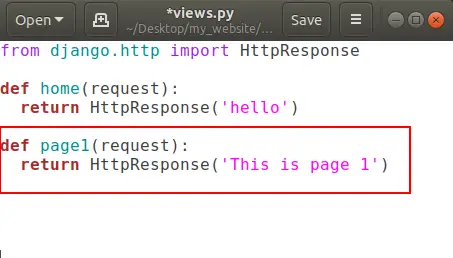
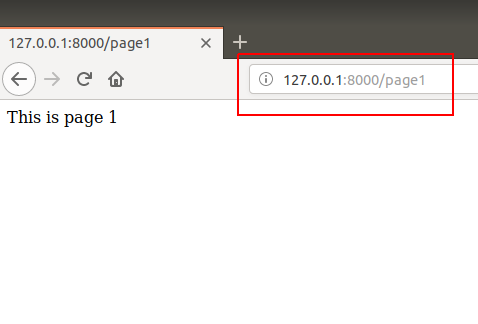
and open your views.py and create a new function for page1 .

Django Custom Webpage 16

That’s all.

Now go to domain-name/page1 (http://127.0.0.1:8000/page1and here is your page1:

 Django Custom Webpage 17

That’s how we can create multiple pages in our website.

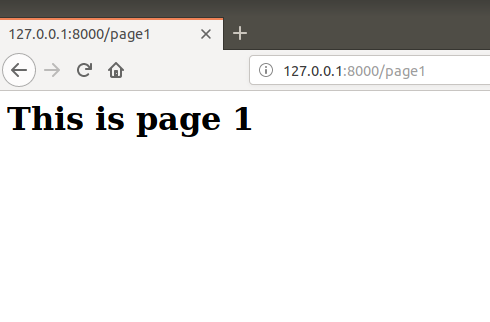
Actually that string we’re returning is some HTML so we can also use HTML tags in it like:

Django Custom Webpage 18

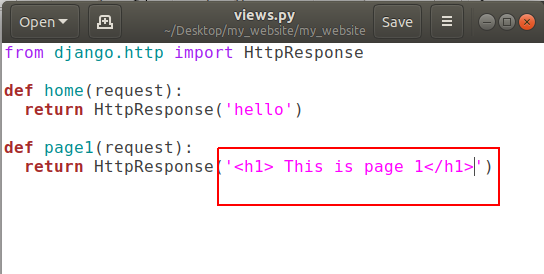
and refresh http://127.0.0.1:8000/page1

Django Custom Webpage 19

Conclusion

After reading and using this tutorial you’ll learn how to add a custom URL to any page, adding custom webpage in django website, creating multiple web-pages in django and the most important thing that is flow of information in django website.

Comment down below if you have any queries.

The post Django Custom Webpage appeared first on The Crazy Programmer.

from The Crazy Programmer https://www.thecrazyprogrammer.com/2018/10/django-custom-webpage.html

6 Tips to Make Your Business Data Backups Secure

Today’s enterprises are heavily dependent on technology and data to facilitate routine operations. The loss of systems and data can cripple an organization for days and in the worst case, run it out of business. That’s why data backups are so essential. But not just any backup will do.

Many business leaders and IT executives believe that the very existence of a process for replicating and storing business data is more than enough to keep the organization’s data secure. As many businesses have learned albeit too late, that can be a catastrophic presumption.

Data backups must be properly secured if they are to live up to their purpose. The following are some of the ways you can protect your data backups.

6 Tips to Make Your Business Data Backups Secure

Image Source

Align Your Policies Accordingly

Make sure your enterprise-wide security policies and procedures take into account back-up related considerations. Backups are essentially a replication of production data and systems. Ergo, whether it’s physical security or system access control, every security policy that applies to the production environment must be similarly and consistently applied to data backups.

If that doesn’t happen, hackers and other malicious persons could use your backup environment to gain access to information they’d otherwise be unable to retrieve on the production system.

Store Backups Offsite

The rationale of backups is to ensure that in the event of an incident that renders production data unusable, the business can retrieve an identical copy of such data to ensure continuity. For this disaster recovery process to work well, the backups must be stored offsite.

At the minimum, backups should be in a separate building. The best case scenario though is to store them in a completely different location or in the cloud. Remember that major disasters such as floods, earthquakes and powerful winds can destroy entire buildings. If production data and backups are within the same premises, they’ll be taken out at one go.

Encrypt

Encrypt your data backups if the backup software you use supports it. In fact, the absence of encryption capability should be reason enough for you to switch to different server backup solutions for business.

Whether you physically move your backup media to a remote site or are transferring the data to a cloud-based backup platform, your backups won’t enjoy quite the same degree of physical control as your production data does. Encrypting your data serves as an additional layer of defense if someone does get past access controls.

Use Fireproof Equipment and Facility

Whether you store your backups on tape, optical disks, magnetic drives or network-attached storage, make sure the media is kept in a fireproof safe and a facility that has robust fire suppression systems. Note that not any fireproof safe will do.

Many organizations make the mistake of storing their backup media in safes that are only fire-rated for paper storage. The assumption is that any safe that can protect something as fragile as paper should be good enough for any other media. This can be a costly miscalculation.

Backup media such as magnetic drives, tapes and optical disks have a lower melting point than paper. A paper-rated safe would thus only provide a false sense of security that will unravel in the event of a fire.

Audit Backup-Related Service Vendors

The backup process will usually involve the participation of several third parties. These range from the backup software and servers, to the physical premises manager and freight service provider. No matter how good your internal backup policies and procedures are, they won’t be as effective as they should if participating vendors aren’t adhering to the same principles.

Your backup procedure should involve periodic audits (once a year or once every two years) where you confirm that vendors are taking reasonable security measures when handling your backup data. Contracts are good but hardly sufficient. Trust but verify. Audit vendors to confirm they are doing what they commit to do.

Test Your Backups

Few things are more disappointing as trying to restore your backups after a major disaster only to find out that they don’t work or the files are corrupted. Your backups are only as good as your ability to restore them.

Test your backups regularly to ensure that you have the right data, that it isn’t corrupted and (for old backups) that it is compatible with existing systems.

Review your data backup procedures and use these tips to identify any gaps. Some loopholes may seem minor but they can make the difference between whether or not your business recovers from the loss of your production systems.

The post 6 Tips to Make Your Business Data Backups Secure appeared first on The Crazy Programmer.

from The Crazy Programmer https://www.thecrazyprogrammer.com/2018/10/6-tips-to-make-your-business-data-backups-secure.html

Difference between Top-down and Bottom-up Approach in Programming

Here you will learn about difference between top-down and bottom-up approach.

Today we are going to have a comparative study of the two approaches being used in field of structured and object oriented programming. We shall start with a brief understanding of the both followed by comparison and conclusion.

Difference between Top-down and Bottom-up Approach in Programming

Image Source

When talking in terms of computer science and programming, the algorithms we use to solve complex problems in a systematic and controlled way are designed on the basis of two approaches that is Top-down and Bottom-up approach. The ideology behind top-down approach is, a bigger problem is divided into some smaller sub-problems called modules, these modules are then solved individually and then integrated together to get the complete solution to the problem. In bottom-up approach on the other hand, the process starts with elementary modules and then combining together to get the desired result. Let us now quickly see in brief what these two approaches has to offer, how they differ from each other and what are the similarities.

Top-Down Approach

The basic idea in top-down approach is to break a complex algorithm or a problem into smaller segments called modules, this process is also called as modularization. The modules are further decomposed until there is no space left for breaking the modules without hampering the originality. The uniqueness of the problem must be retained and preserved. The decomposition of the modules is restricted after achieving a certain level of modularity. The top-down way of solving a program is step-by-step process of breaking down the problem into chunks for organising and solving the sole problem. The C- programming language uses the top-down approach of solving a problem in which the flow of control is in the downward direction.

Bottom-Up Approach

As the name suggests, this method of solving a problem works exactly opposite of how the top-down approach works. In this approach we start working from the most basic level of problem solving and moving up in conjugation of several parts of the solution to achieve required results. The most fundamental units, modules and sub-modules are designed and solved individually, these units are then integrated together to get a more concrete base to problem solving.

This bottom-up approach works in different phases or layers. Each module designed is tested at fundamental level that means unit testing is done before the integration of the individual modules to get solution. Unit testing is accomplished using low-level functions, that is another topic we will talk about later.

Let us now see a comparative study of both the strategies and try to understand what are common and odds among them.

Difference between Top-down and Bottom-up Approach

Top-Down Approach Bottom-Up Approach
Divides a problem into smaller units and then solve it. Starts from solving small modules and adding them up together.
This approach contains redundant information. Redundancy can easily be eliminated.
A well-established communication is not required. Communication among steps is mandatory.
The individual modules are thoroughly analysed. Works on the concept of data-hiding and encapsulation.
Structured programming languages such as C uses top-down approach. OOP languages like C++ and Java, etc. uses bottom-up mechanism.
Relation among modules is not always required. The modules must be related for better communication and work flow.
Primarily used in code implementation, test case generation, debugging and module documentation. Finds use primarily in testing.

Conclusion

After having a sound discussion on this we all should now have got a clear understanding of the two approaches. The top-down approach is the conventional approach in which decomposition of higher level system into lower level system takes place respectively. Talking about the bottom-up mechanism for algorithm designing, starting from designing lower abstraction modules and then integrating them to higher level provides better efficiency.

We have seen the modules in top-down approach aren’t connected in a manner so that they can communicate well, so giving rise to redundancies, whereas in the later case the redundancies are omitted to large extent. The feature of information hiding and reusability provided by bottom-up approach makes this mechanism even more popular.

Comment below if you have doubts regarding difference between Top-down and Bottom-up approach.

The post Difference between Top-down and Bottom-up Approach in Programming appeared first on The Crazy Programmer.

from The Crazy Programmer https://www.thecrazyprogrammer.com/2018/10/difference-between-top-down-and-bottom-up-approach.html

Troubleshooting Windows 10 Nearby Sharing and Bluetooth Antennas

wifi

When building my Ultimate Developer PC I picked this motherboard, and it’s lovely.

  • ASUS ROG STRIX LGA2066 X299 ATX Motherboard – Good solid board with built in BT and Wifi, an M.2 heatsink included, 3x PCIe 3.0 x16 SafeSlots (supports triple @ x16/x16/x8), 1x PCIe 3.0 x4, 2x PCIe 3.0 x1 and a Max of 128 gigs of RAM. It also has 8x USB 3.1s and a USB C which is nice.

I put it all together and I’ve thrilled with the machine. However, recently I was trying to use the new Windows 10 “Nearby Devices” feature.

It’s this cool feature that lets you share stuff to “Nearby Devices” – that means your laptop, other desktops, whatever. Similar to AirDrop, it solves that problem of moving stuff between devices without using an intermediate server.

You can turn it on in Settings on Windows 10 and decide if you want to receive data from everyone or just contacts.

Nearby Sharing

So I started using on my new Desktop, IRONHEART, but I kept getting this “Looking for nearby devices” dialog…and it would just do nothing.

Looking for Nearby Devices

It turns out that the ASUS Motherboard also comes with a Wi-Fi Antenna. I don’t use Wifi (I’m wired) so I didn’t bother attaching it. It seems that this antenna is also a Bluetooth antenna and if you plug it in you’ll ACTUALLY GET A LOVELY BLUETOOTH SIGNAL. Who knew? 😉

Now I can easily right click on files in Explorer or Web Pages in Edge and transfer them between systems.

Sharing a file with Nearby Sharing

A few tips on Nearby Sharing

  • Make sure you know your visibility settings. From the Start Menu type “nearby sharing” and confirm them.
  • Make sure the receiving device doesn’t have “Focus Assist” on (via the Action Center in the lower right of the screen) or you might miss the notification.
  • And if you’re using a desktop like me, ahem, plug in your BT antenna

Hope this helps someone because Nearby Sharing is a great feature that I’m now using all the time.


Sponsor: Telerik DevCraft is the comprehensive suite of .NET and JavaScript components and productivity tools developers use to build high-performant, modern web, mobile, desktop apps and chatbots. Try it!


© 2018 Scott Hanselman. All rights reserved.


from Scott Hanselman’s Blog http://feeds.hanselman.com/~/573061918/0/scotthanselman~Troubleshooting-Windows-Nearby-Sharing-and-Bluetooth-Antennas.aspx

Headless CMS and Decoupled CMS in .NET Core

Headless by Wendy used under CC https://flic.kr/p/HkESxWI’m sure I’ll miss some, so if I do, please sound off in the comments and I’ll update this post over the next week or so!

Lately I’ve been noticing a lot of “Headless” CMSs (Content Management System). A ton, in fact. I wanted to explore this concept and see if it’s a fad or if it’s really something useful.

Given the rise of clean RESTful APIs has come the rise of Headless CMS systems. We’ve all evaluated CMS systems (ones that included both front- and back-ends) and found the front-end wanting. Perhaps it lacks flexibility OR it’s way too flexible and overwhelming. In fact, when I wrote my podcast website I considered a CMS but decided it felt too heavy for just a small site.

A Headless CMS is a back-end only content management system (CMS) built from the ground up as a content repository that makes content accessible via a RESTful API for display on any device.

I could start with a database but what if I started with a CMS that was just a backend – a headless CMS. I’ll handle the front end, and it’ll handle the persistence.

Here’s what I found when exploring .NET Core-based Headless CMSs. One thing worth noting, is that given Docker containers and the ease with which we can deploy hybrid systems, some of these solutions have .NET Core front-ends and “who cares, it returns JSON” for the back-end!

Lynicon

Lyncicon is literally implemented as a NuGet Library! It stores its data as structured JSON. It’s built on top of ASP.NET Core and uses MVC concepts and architecture.

It does include a front-end for administration but it’s not required. It will return HTML or JSON depending on what HTTP headers are sent in. This means you can easily use it as the back-end for your Angular or existing SPA apps.

Lyncion is largely open source at https://github.com/jamesej/lyniconanc. If you want to take it to the next level there’s a small fee that gives you updated searching, publishing, and caching modules.

ButterCMS

ButterCMS is an API-based CMS that seamlessly integrates with ASP.NET applications. It has an SDK that drops into ASP.NET Core and also returns data as JSON. Pulling the data out and showing it in a few is easy.

public class CaseStudyController : Controller
{
    private ButterCMSClient Client;
    private static string _apiToken = "";
    public CaseStudyController()
    {
        Client = new ButterCMSClient(_apiToken);
    }
    [Route("customers/{slug}")]
    public async Task<ActionResult> ShowCaseStudy(string slug)
    {
      butterClient.ListPageAsync()
        var json = await Client.ListPageAsync("customer_case_study", slug)
        dynamic page = ((dynamic)JsonConvert.DeserializeObject(json)).data.fields;
        ViewBag.SeoTitle = page.seo_title;
        ViewBag.FacebookTitle = page.facebook_open_graph_title;
        ViewBag.Headline = page.headline;
        ViewBag.CustomerLogo = page.customer_logo;
        ViewBag.Testimonial = page.testimonial;
        return View("Location");
    } 
}

Then of course output into Razor (or putting all of this into a RazorPage) is simple:

<html>
  <head>
    <title>@ViewBag.SeoTitle</title>
    <meta property="og:title" content="@ViewBag.FacebookTitle" /> 
  </head>
  <body>
    <h1>@ViewBag.Headline</h1>
    <img width="100%" src="@ViewBag.CustomerLogo">
    <p>@ViewBag.Testimonial</p>
  </body>
</html>

Butter is a little different (and somewhat unusual) in that their backend API is a SaaS (Software as a Service) and they host it. They then have SDKs for lots of platforms including .NET Core. The backend is not open source while the front-end is https://github.com/ButterCMS/buttercms-csharp.

Piranha CMS

Piranha CMS is built on ASP.NET Core and is open source on GitHub. It’s also totally package-based using NuGet and can be easily started up with a dotnet new template like this:

dotnet new -i Piranha.BasicWeb.CSharp
dotnet new piranha
dotnet restore
dotnet run

It even includes a new Blog template that includes Bootstrap 4.0 and is all set for customization. It does include optional lightweight front-end but you can use those as guidelines to create your own client code. One nice touch is that Piranha also images image resizing and cropping.

Umbraco Headless

The main ASP.NET website currently uses Umbraco as its CMS. Umbraco is a well-known open source CMS that will soon include a Headless option for more flexibility. The open source code for Umbraco is up here https://github.com/umbraco.

Orchard Core

Orchard is a CMS with a very strong community and fantastic documentation. Orchard Core is a redevelopment of Orchard using open source ASP.NET Core. While it’s not “headless” it is using a Decoupled Architecture. Nothing would prevent you from removing the UI and presenting the content with your own front-end. It’s also cross-platform and container friendly.

Squidex

“Squidex is an open source headless CMS and content management hub. In contrast to a traditional CMS Squidex provides a rich API with OData filter and Swagger definitions.” Squidex is build with ASP.NET Core and the CQRS pattern and works with both Windows and Linux on today’s browsers.

Squidex is open source with excellent docs at https://docs.squidex.io. Docs are at https://docs.squidex.io. They are also working on a hosted version you can play with here https://cloud.squidex.io. Samples on how to consume it are here https://github.com/Squidex/squidex-samples.

The consumption is super clean:

[Route("/{slug},{id}/")]
public async Task<IActionResult> Post(string slug, string id)
{
    var post = await apiClient.GetBlogPostAsync(id);
    var vm = new PostVM
    {
        Post = post
    };
    return View(vm);
}

And then the View:

@model PostVM
@{
    ViewData["Title"] = Model.Post.Data.Title;
}

@Model.Post.Data.Title

@Html.Raw(Model.Post.Data.Text)

What .NET Core Headless CMSs did I miss? Let me know.

*Photo “headless” by Wendy used under CC https://flic.kr/p/HkESxW


Sponsor: Telerik DevCraftTelerik DevCraft is the comprehensive suite of .NET and JavaScript components and productivity tools developers use to build high-performant, modern web, mobile, desktop apps and chatbots. Try it!


© 2018 Scott Hanselman. All rights reserved.


from Scott Hanselman’s Blog http://feeds.hanselman.com/~/572565368/0/scotthanselman~Headless-CMS-and-Decoupled-CMS-in-NET-Core.aspx

Types of Data Structures

Data structures are a very important programming concept. They provide us with a means to store, organize and retrieve data in an efficient manner. The data structures are used to make working with our data, easier. There are many data structures which help us with this.

Types of Data Structures

Types of Data Structures

Image Source

Primitive Data Structures

These are the structures which are supported at the machine level, they can be used to make non-primitive data structures. These are integral and are pure in form. They have predefined behavior and specifications.

Examples: Integer, float, character, pointers.

The pointers, however don’t hold a data value, instead, they hold memory addresses of the data values. These are also called the reference data types.

Non-primitive Data Structures

The non-primitive data structures cannot be performed without the primitive data structures. Although, they too are provided by the system itself yet they are derived data structures and cannot be formed without using the primitive data structures.

The Non-primitive data structures are further divided into the following categories:

1. Arrays

Arrays are a homogeneous and contiguous collection of same data types. They have a static memory allocation technique, which means, if memory space is allocated for once, it cannot be changed during runtime. The arrays are used to implement vectors, matrices and also other data structures. If we do not know the memory to be allocated in advance then array can lead to wastage of memory. Also, insertions and deletions are complex in arrays since elements are stored in consecutive memory allocations.

2. Files

A file is a collection of records. The file data structure is primarily used for managing large amounts of data which is not in the primary storage of the system. The files help us to process, manage, access and retrieve or basically work with such data, easily.

3. Lists

The lists support dynamic memory allocation. The memory space allocated, can be changed at run time also. The lists are of two types:

a) Linear Lists

The linear lists are those which have the elements stored in a sequential order. The insertions and deletions are easier in the lists. They are divided into two types:

  • Stacks: The stack follows a “LIFO” technique for storing and retrieving elements. The element which is stored at the end will be the first one to be retrieved from the stack. The stack has the following primary functions:
    • Push(): To insert an element in the stack.
    • Pop(): To remove an element from the stack.
  • Queues: The queues follow “FIFO” mechanism for storing and retrieving elements. The elements which are stored first into the queue will only be the first elements to be removed out from the queue. The “ENQUEUE” operation is used to insert an element into the queue whereas the “DEQUEUE” operation is used to remove an element from the queue.

b) Non Linear Lists
The non linear lists do not have elements stored in a certain manner. These are:

  • Graphs: The Graph data structure is used to represent a network. It comprises of vertices and edges (to connect the vertices). The graphs are very useful when it comes to study a network.
  • Trees: Tree data structure comprises of nodes connected in a particular arrangement and they (particularly binary trees) make search operations on the data items easy. The tree data structures consists of a root node which is further divided into various child nodes and so on. The number of levels of the tree is also called height of the tree.

Data structures give us a means to work with the data. Since, we already have lots of problems to deal with, it completely depends on the requirement of our problem which data structure to select. The right selection of an appropriate data structure for solving a particular problem can prove very beneficial and also help reduce the complexity of the program.

The post Types of Data Structures appeared first on The Crazy Programmer.

from The Crazy Programmer https://www.thecrazyprogrammer.com/2018/10/types-of-data-structures.html

Exploring .NET Core’s SourceLink – Stepping into the Source Code of NuGet packages you don’t own

According to https://github.com/dotnet/sourcelink, SourceLink “enables a great source debugging experience for your users, by adding source control metadata to your built assets.”

Sound fantastic. I download a NuGet to use something like Json.NET or whatever all the time, I’d love to be able to “Step Into” the source even if I don’t have laying around. Per the GitHub, it’s both language and source control agnostic. I read that to mean “not just C# and not just GitHub.”

Visual Studio 15.3+ supports reading SourceLink information from symbols while debugging. It downloads and displays the appropriate commit-specific source for users, such as from raw.githubusercontent, enabling breakpoints and all other sources debugging experience on arbitrary NuGet dependencies. Visual Studio 15.7+ supports downloading source files from private GitHub and Azure DevOps (former VSTS) repositories that require authentication.

Looks like Cameron Taggart did the original implementation and then the .NET team worked with Cameron and the .NET Foundation to make the current version. Also cool.

Download Source and Continue Debugging

Let me see if this really works and how easy (or not) it is.

I’m going to make a little library using the 5 year old Pseudointernationalizer from here. Fortunately the main function is pretty pure and drops into a .NET Standard library neatly.

I’ll put this on GitHub, so I will include “PublishRepositoryUrl” and “EmbedUntrackedSources” as well as including the PDBs. So far my CSPROJ looks like this:

<Project Sdk="Microsoft.NET.Sdk">

<PropertyGroup>
<TargetFramework>netstandard2.0</TargetFramework>
<PublishRepositoryUrl>true</PublishRepositoryUrl>
true</EmbedUntrackedSources>
<AllowedOutputExtensionsInPackageBuildOutputFolder>$(AllowedOutputExtensionsInPackageBuildOutputFolder);.pdb</AllowedOutputExtensionsInPackageBuildOutputFolder>
</PropertyGroup>
</Project>

Pretty straightforward so far. As I am using GitHub I added this reference, but if I was using GitLab or BitBucket, etc, I would use that specific provider per the docs.

<ItemGroup>

<PackageReference Include="Microsoft.SourceLink.GitHub" Version="1.0.0-beta-63127-02" PrivateAssets="All"/>
</ItemGroup>

Now I’ll pack up my project as a NuGet package.

D:\github\SourceLinkTest\PsuedoizerCore [master ≡]> dotnet pack -c release

Microsoft (R) Build Engine version 15.8.166+gd4e8d81a88 for .NET Core
Copyright (C) Microsoft Corporation. All rights reserved.

Restoring packages for D:\github\SourceLinkTest\PsuedoizerCore\PsuedoizerCore.csproj...
Generating MSBuild file D:\github\SourceLinkTest\PsuedoizerCore\obj\PsuedoizerCore.csproj.nuget.g.props.
Restore completed in 96.7 ms for D:\github\SourceLinkTest\PsuedoizerCore\PsuedoizerCore.csproj.
PsuedoizerCore -> D:\github\SourceLinkTest\PsuedoizerCore\bin\release\netstandard2.0\PsuedoizerCore.dll
Successfully created package 'D:\github\SourceLinkTest\PsuedoizerCore\bin\release\PsuedoizerCore.1.0.0.nupkg'.

Let’s look inside the .nupkg as they are just ZIP files. Ah, check out the generated *.nuspec file that’s inside!

<?xml version="1.0" encoding="utf-8"?>

<package xmlns="http://schemas.microsoft.com/packaging/2012/06/nuspec.xsd">
<metadata>
<id>PsuedoizerCore</id>
<version>1.0.0</version>
<authors>PsuedoizerCore</authors>
<owners>PsuedoizerCore</owners>
<requireLicenseAcceptance>false</requireLicenseAcceptance>
<description>Package Description</description>
<repository type="git" url="https://github.com/shanselman/PsuedoizerCore.git" commit="35024ca864cf306251a102fbca154b483b58a771" />
<dependencies>
<group targetFramework=".NETStandard2.0" />
</dependencies>
</metadata>
</package>

See under repository it points back to the location AND commit hash for this binary! That means I can give it to you or a coworker and they’d be able to get to the source. But what’s the consumption experience like? I’ll go over and start a new Console app that CONSUMES my NuGet library package. To make totally sure that I don’t accidentally pick up the source from my machine I’m going to delete the entire folder. This source code no longer exists on this machine.

I’m using a “local” NuGet Feed. In fact, it’s just a folder. Check it out:

D:\github\SourceLinkTest\AConsumerConsole> dotnet add package PsuedoizerCore -s "c:\users\scott\desktop\LocalNuGetFeed"

Writing C:\Users\scott\AppData\Local\Temp\tmpBECA.tmp
info : Adding PackageReference for package 'PsuedoizerCore' into project 'D:\github\SourceLinkTest\AConsumerConsole\AConsumerConsole.csproj'.
log : Restoring packages for D:\github\SourceLinkTest\AConsumerConsole\AConsumerConsole.csproj...
info : GET https://api.nuget.org/v3-flatcontainer/psuedoizercore/index.json
info : NotFound https://api.nuget.org/v3-flatcontainer/psuedoizercore/index.json 465ms
log : Installing PsuedoizerCore 1.0.0.
info : Package 'PsuedoizerCore' is compatible with all the specified frameworks in project 'D:\github\SourceLinkTest\AConsumerConsole\AConsumerConsole.csproj'.
info : PackageReference for package 'PsuedoizerCore' version '1.0.0' added to file 'D:\github\SourceLinkTest\AConsumerConsole\AConsumerConsole.csproj'.

See how I used -s to point to an alternate source? I could also configure my NuGet feeds, be they local directories or internal servers with “dotnet new nugetconfig” and including my NuGet Servers in the order I want them searched.

Here is my little app:

using System;

using Utils;

namespace AConsumerConsole
{
class Program
{
static void Main(string[] args)
{
Console.WriteLine(Pseudoizer.ConvertToFakeInternationalized("Hello World!"));
}
}
}

And the output is [Ħęľľő Ŵőřľđ! !!! !!!].

But can I step into it? I don’t have the source remember…I’m using SourceLink.

In Visual Studio 2017 I confirm that SourceLink is enabled. This is the Portable PDB version of SourceLink, not the “SourceLink 1.0” that was “Enable Source Server Support.” That only worked on Windows..

Enable Source Link Support

You’ll also want to turn off “Just My Code” since, well, this isn’t your code.

Disable Just My Code

Now I’ll start a Debug Session in my consumer app and hit F11 to Step Into the Library whose source I do not have!

Source Link Will Download from The Internet

Fantastic. It’s going to get the source for me! Without git cloning the repository it will seamlessly let me continue my debugging session.

The temporary file ended up in C:\Users\scott\AppData\Local\SourceServer\4bbf4c0dc8560e42e656aa2150024c8e60b7f9b91b3823b7244d47931640a9b9 if you’re interested. I’m able to just keep debugging as if I had the source…because I do! It came from the linked source.

Debugging into a NuGet that I don't have the source for

Very cool. I’m going to keep digging into SourceLink and learning about it. It seems that if YOU have a library or published NuGet either inside your company OR out in the open source world that you absolutely should be using SourceLink.

You can even install the sourcelink global tool and test your .pdb files for greater insight.

D:\github\SourceLinkTest\PsuedoizerCore>dotnet tool install --global sourcelink

D:\github\SourceLinkTest\PsuedoizerCore\bin\release\netstandard2.0>sourcelink print-urls PsuedoizerCore.pdb
43c83e7173f316e96db2d8345a3f963527269651 sha1 csharp D:\github\SourceLinkTest\PsuedoizerCore\Psuedoizer.cs
https://raw.githubusercontent.com/shanselman/PsuedoizerCore/02c09baa8bfdee3b6cdf4be89bd98c8157b0bc08/Psuedoizer.cs
bfafbaee93e85cd2e5e864bff949f60044313638 sha1 csharp C:\Users\scott\AppData\Local\Temp\.NETStandard,Version=v2.0.AssemblyAttributes.cs
embedded

Think about how much easier consumers of your library will have it when debugging their apps! Your package is no longer a black box. Go set this up on your projects today.


Sponsor: Rider 2018.2 is here! Publishing to IIS, Docker support in the debugger, built-in spell checking, MacBook Touch Bar support, full C# 7.3 support, advanced Unity support, and more.


© 2018 Scott Hanselman. All rights reserved.


from Scott Hanselman’s Blog http://feeds.hanselman.com/~/572090062/0/scotthanselman~Exploring-NET-Cores-SourceLink-Stepping-into-the-Source-Code-of-NuGet-packages-you-dont-own.aspx

Design a site like this with WordPress.com
Get started